¶ When Can We Set and Select the Snow Throwing Direction?
After setting up the Data Center and Docking Station according to the app instructions, you should first draw a Pathway from the Docking Station (serving as the origin) to the Working Area.
Once the Working Area is outlined, the app will prompt: “Please click on the Boundary of the area to select the direction of snow throwing.” You can configure the Snow Throwing Direction at this step.
¶ Two Methods for Setting the Snow Throwing Direction
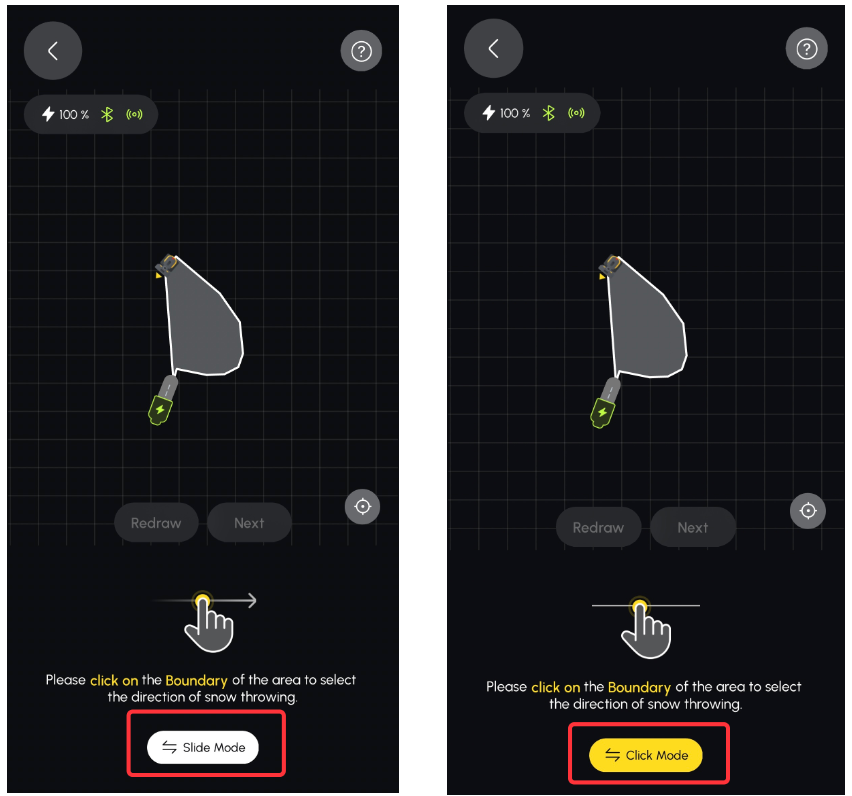
We provide two modes for selecting the Snow Throwing Direction: Slide Mode and Click Mode, as shown in the red box below:
¶ Differences Between Side Mode and Click Mode
• Slide Mode: In this mode, you slide your finger along the boundary of the Working Area. It is recommended for irregular or non-straight boundaries (As shown above on the right border of the working area). Slide Mode offers more flexibility for setting the Snow Throwing Direction.
• Click Mode: Click on the boundary of the Working Area. This is often referred to as the “lazy mode.” When the boundary is regular or straight (As shown above on the left border of the working area), you can click on any point along the boundary to select the entire boundary as the Snow Throwing Direction, making the setup simpler and quicker.
¶ How to Select the Snow Throwing Direction
Once you understand the differences between the two modes, let’s see how to select the Snow Throwing Direction.
By default, the app is set to Slide Mode. To choose the Snow Throwing Direction, slide your finger along the boundary of the Working Area. We recommend selecting a long, unobstructed boundary line as the Snow Throwing Direction. However, if the long boundary may direct snow into a neighbor’s area, please choose the most optimal Snow Throwing Direction based on your situation.
When you click the Slide Mode button, it will switch to Click Mode to set the Snow Throwing Direction. In Click Mode, simply click on a single point along the boundary to select the entire boundary as the Snow Throwing Direction. Once again, we recommend selecting a long, unobstructed boundary line for the Snow Throwing Direction. Please choose the direction that best suits your specific situation.
¶ Adjusting the Snow Throwing Direction During Operation
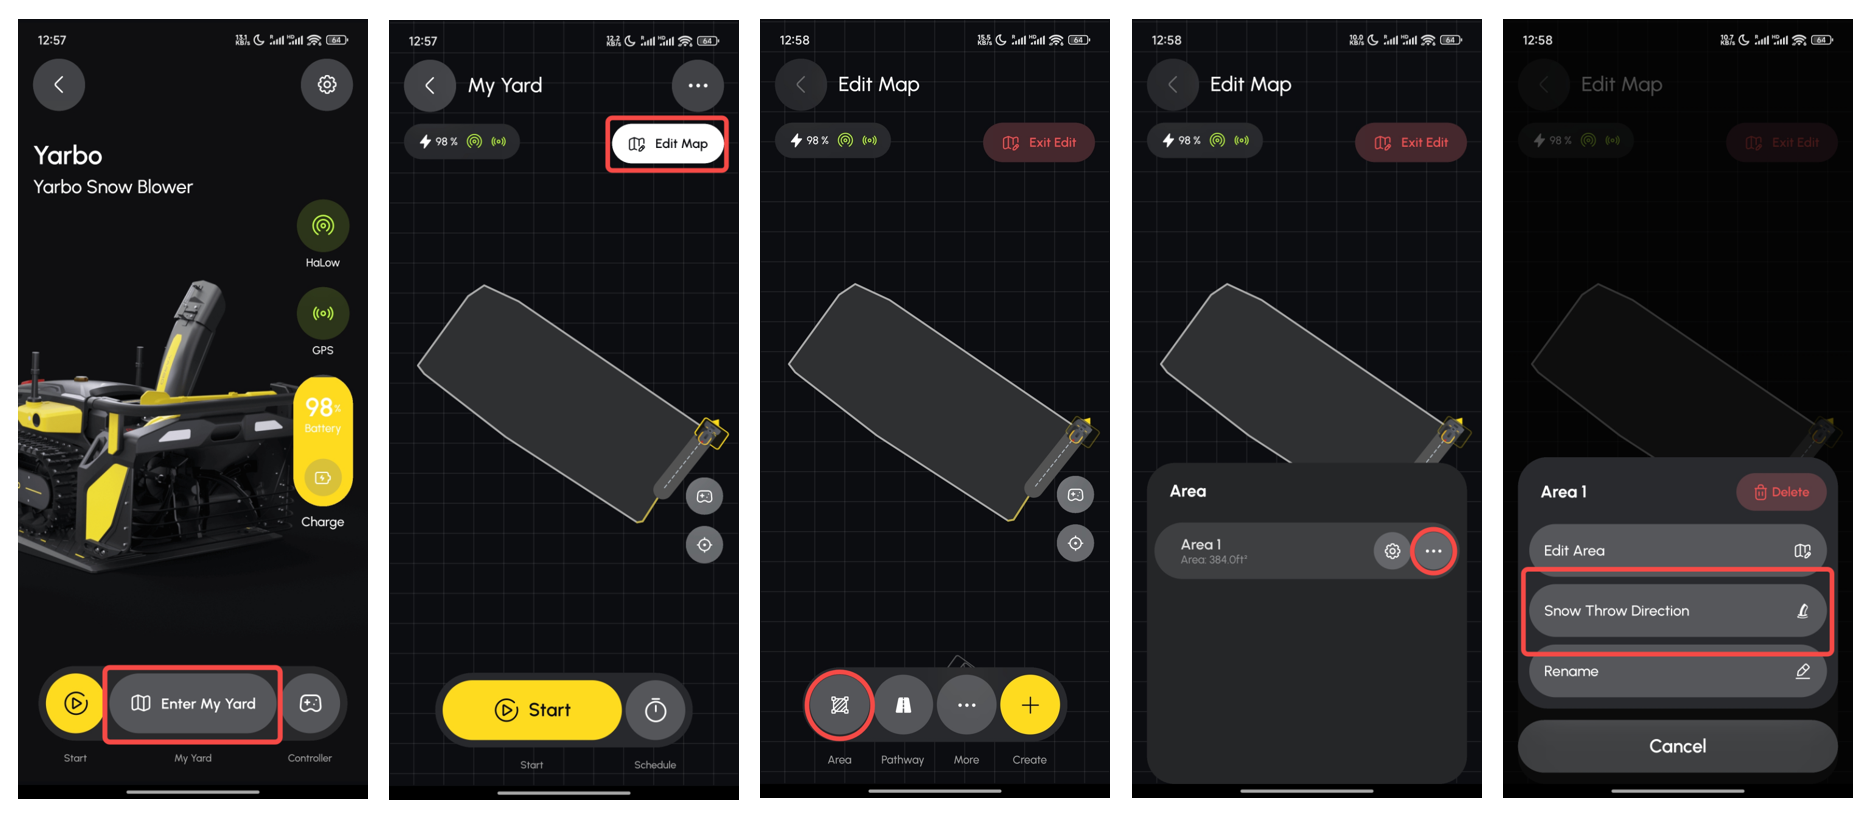
If you find that the selected Snow Throwing Direction needs adjustment while your Yarbo is working, you can easily change it in the app. Simply follow steps 1, 2, 3, 4, and 5 shown in the image below to reconfigure the Snow Throwing Direction.
¶ Community-Proven Mapping Tips
Over time, advanced users in the Yarbo community have found ways to greatly improve efficiency and consistency. These tips have proven extremely effective:
¶ Tip 1: Use Only One Side as the Snow Throwing Direction (Most Efficient)
Many experienced users recommend:
Select snow throwing direction on only ONE side of the work area.
Why this works:
- Yarbo does not need to switch snow direction mid-route
- Patterns become cleaner and more predictable
- Reduces zig-zag behavior
- Minimizes chute rotation, improving efficiency
Result:
A much more efficient, consistent clearing pattern—especially on longer driveways.
¶ Tip 2: For Wide Driveways, Split Into Two Work Areas
If your driveway is too wide for snow to reach the opposite side (very common), sticking to one boundary direction may not be enough.
User feedback example:
“My driveway is wider and the snow won’t reach all the way across.”
Community solution:
Split the driveway into two narrower Work Areas
Left Area → set snow throw direction to left
Right Area → set snow throw direction to right
This solves multiple issues:
- Ensures snow is thrown far enough in each section
- Produces a more efficient pattern
- Allows targeted clearing of plow piles at driveway ends
- Lets you run only one side when needed (e.g., snow drift on one side only)
This approach works extremely well for long and wide driveways.