¶ What is this Document? Who is it for?
This document – The Big README – was posted in Yarbo Users and Community on Facebook on May 19, 2025 and then the Yarbo Forum, with lots of updates since.
The aim is to introduce quirks and oddities, along with helpful information, to new Yarbo owners who are just unpacking their devices. Long time Yarbo owners may be interested in some of the “I didn't know that!” items. There's a goal to answer the questions most often posted on Social Media, so there will be frequent updates.
The document is meant to be a bit of a brain dump, be user-talking-to-user, and have brief explanations, not detailed step-by-step instructions or lots of technical detail. Links are provided to additional material if available.
Several Forum users have suggested items or have provided information. Thank you, and please continue. - Ken Leonard (the TL;DR Guy)
¶ Yarbo Glossary
- “Core” and “Rover” - same thing. That’s the main unit.
- Module refers to the swappable tool that attaches to the front of the rover. I have the lawn mower and snowblower.
¶ Unpacking Your Yarbo
- Tools? The only tools you'll need to supply may be to help install your Data Center mounting bracket. All assembly, installation, and maintenance of your Yarbo can be done with tools supplied with your Yarbo equipment. Hold onto them!
- RTK antennas are on top of the tall masts – they are not missing, they unscrew.
- The hand controller is in the battery compartment.
- You can drive the rover out of its box and don’t have to lift it up. See The Hand Controller info just below.
- The Data Center is packed into the foam tight in one of the boxes. Don’t rip out the foam and watch it fly across the room like really dumb people do (thankfully it’s a tank and didn’t break on me).
- Yarbo includes a PoE+ injector for you. If you supply your own PoE+ injector, a post by users on the Yarbo Forum indicates power use as 54V at 73mA (something just under 4W).
- Yarbo is packed very well. When you are sure you no longer need your Yarbo boxes, you may recycle them or use them for a bomb shelter. Elon tapped Yarbo to pack fresh eggs to send on rockets to Mars.
- Your Mower Pro has two sets of blades. The Pro uses a set of mulching blades that look like a smaller version of what you'd find on a push mower. The Pro can also use the razor blades and discs similar to the original mower, but note that the Pro's discs are not compatible with the original mower.
- Track Grease is a maintenance item and is not included with your Yarbo. See the Maintenance section for additional information about track grease. Tracks supplied with the Yarbo are greased from the factory.
The Hand Controller…
…can be a confusing piece of kit for new peeps. But the X-Box style hand controller one of the first things you will want to use.
This video from Yarbo, recommended here by Shanie on the Yarbo Forum, shows you how to pair and use the hand controller: Step-by-Step Guide: Try the Controller
Here is the Way Too Quick Of A Start with the hand controller:
- Charge the hand controller using a USB cable
- Have your rover set up with the SAM or other module and powered up
- Turn on the hand controller (press the Yarbo logo button)
- Pair the hand controller with your rover (hold down Setup until the rover responds)
- Learn the magic incantations to get the rover to do what you want. Here are some:
- Move: On the back of the controller are buttons that wrap around the top edge. Hold down the right one, now move a joystick. Hold down the joystick for faster speed.
- Start the auger/blades: Hold down both trigger buttons for 5 seconds. When the blades or auger start, you may release one of the trigger buttons.
- Other buttons turn lights on/off, raise/lower the module, that kind of thing.
- Yarbo's documentation and videos cover this a bit more, but I think you're over the confusing part. So have fun with your new RC car…I mean multi-purpose yard robot.
¶ Installation and Configuration
- When installing your devices in the App, get the rover installed first and added to your account. Then install the Data Center.
- Line-of-sight is not required for proper communication between the Docking Station and Data Center nor between the Data Center and rover while the rover is out working. Communication is done mostly through HaLow, which is reliable and covers a large area.
- Some people report luck with the Data Center inside an attic or garage. It is not recommended. Give HaLow and GPS every chance of success by mounting the Data Center and Docking Station in accordance with Yarbo’s recommendations.
- Your Docking Station may not be installed in a mapped Area. Any areas you map may not include the Docking Station. Use caution around the Docking Station's wires if you are mapping near the Docking Station. You can sneak a Deadend or Sidewalk alongside the Docking Station to do a bit of cleanup. Watch. Those. Wires!
- You may have multiple Docking Stations or use the same Docking Station in multiple spots, but only one Docking Station or spot may be enabled at a time in the Yarbo App. A use case for this would be having a Summer Docking Station at the edge of your lawn out back and a Winter Docking Station nearer your driveway outside the fence up front. If you have just one Docking Station, you can physically move your Docking Station for each season, just make sure it winds up in exactly the same spot you’ve already mapped so you don’t need to re-map anything. Enable the spot you want to use in the App.
- You can mount your Data Center on a fence post, a shed, or way high up on your house, always ensuring 120 degrees of view to the sky 360 degrees around. Mount it as high up and open as you can, especially if you have uneven ground the rover can duck behind, as the rover can lose HaLow if the signal to/from the rover can be blocked by metal (like a metal roof) or a small hill. The rover will try WiFi and Cell if HaLow drops, but aim for great HaLow coverage by installing the Data Center in the best location.
From Yarbo Support:
We strongly recommend placing the Data Center in a location with an unobstructed view of at least 120° of the sky, ideally on the rooftop or the highest point in your environment. This placement is crucial because a stable RTK signal depends on the number of satellites that are shared between the rover and the Data Center — they need to see at least 15 of the same satellites to maintain reliable positioning and communication. A higher placement can significantly improve connection stability and mowing performance.
- You may ground the Data Center using 6 gauge solid copper ground wire. For our Metric friends that's…ummm…scary numbers with decimals and stuff.
6 AWG (American Wire Gauge) wire is equivalent to a cross-sectional area of approximately 13.3 square millimeters (mm²).
(Thanks, Gemini. Consult a certified professional if you have questions about the wiring for any product installation.)
- If you move your Data Center, you will need to re-map. The Data Center's exact location is used as the map center. Moving the device shifts the maps and where they are on your property.
- For the most reliable performance, Yarbo recommends one rover per Data Center. Contact Yarbo Support if you wish to add a second Yarbo to your Data Center. There are trade-offs if you have multiple rovers on one Data Center:
- Only one unit can use HaLow at a time, so the other must rely on WiFi or 4G (Cell).
- RTK signal stability may decrease, especially if both units are working simultaneously.
- Network disruptions can affect RTK correction data delivery to both units.
- Using the same Data Center allows multiple rovers to have the same map center, but the rovers do not share actual maps or coordinate their activities.
- You can use a WiFi Extender with an Ethernet port for your Data Center. If the WiFi Extender gives you trouble and is somewhat configurable, set it to 2.4GHz or 5GHz only and turn off the WiFi radio so nothing can connect to it (that worked for my old piece of junk WiFi Extender…my new extender (from this century) is working OK without these workarounds). Going hardwired to your main router is preferred/recommended.
IMPORTANT: Make sure the Ethernet port in the WiFi Extender is not just a “backchannel” to a router and will allow devices plugged into it access to your network.
¶ Data Center light is flashing red
If your Data Center light is flashing red, look at the following:
- The likely culprit: Your Data Center was installed in the App before your rover. Check that the rover has been added to the App and you did so prior to installing the Data Center into the App. If you installed the Data Center first:
- Get the rover assembled and booted and installed into the App.
- Reinstall the Data Center in the App.
- If your Data Center has 2 ports along the bottom, use the WAN port (left port) when looking at the front of the Data Center.
- Ensure the Data Center is cabled into your router and the port it is on enables connection of devices to your network. Some Ethernet ports may be off or in some devices may be set as a “backchannel.”
- Get close to the Data Center. From the Yarbo App connect to the Data Center with Bluetooth and upgrade the firmware.
- Setup the Data Center and Docking Station.
- When everything is set up per the Yarbo documentation, if the Data Center is still flashing red, power off the Data Center (pull the PoE power) and rover (pull the battery). Restore power to the Data Center, give it a few minutes, then click the power button on back of the rover. The Data Center and rover should connect. (This flummoxed me when I did my initial setup – all I had to do was hard power cycle the rover, and the Data Center went green.)
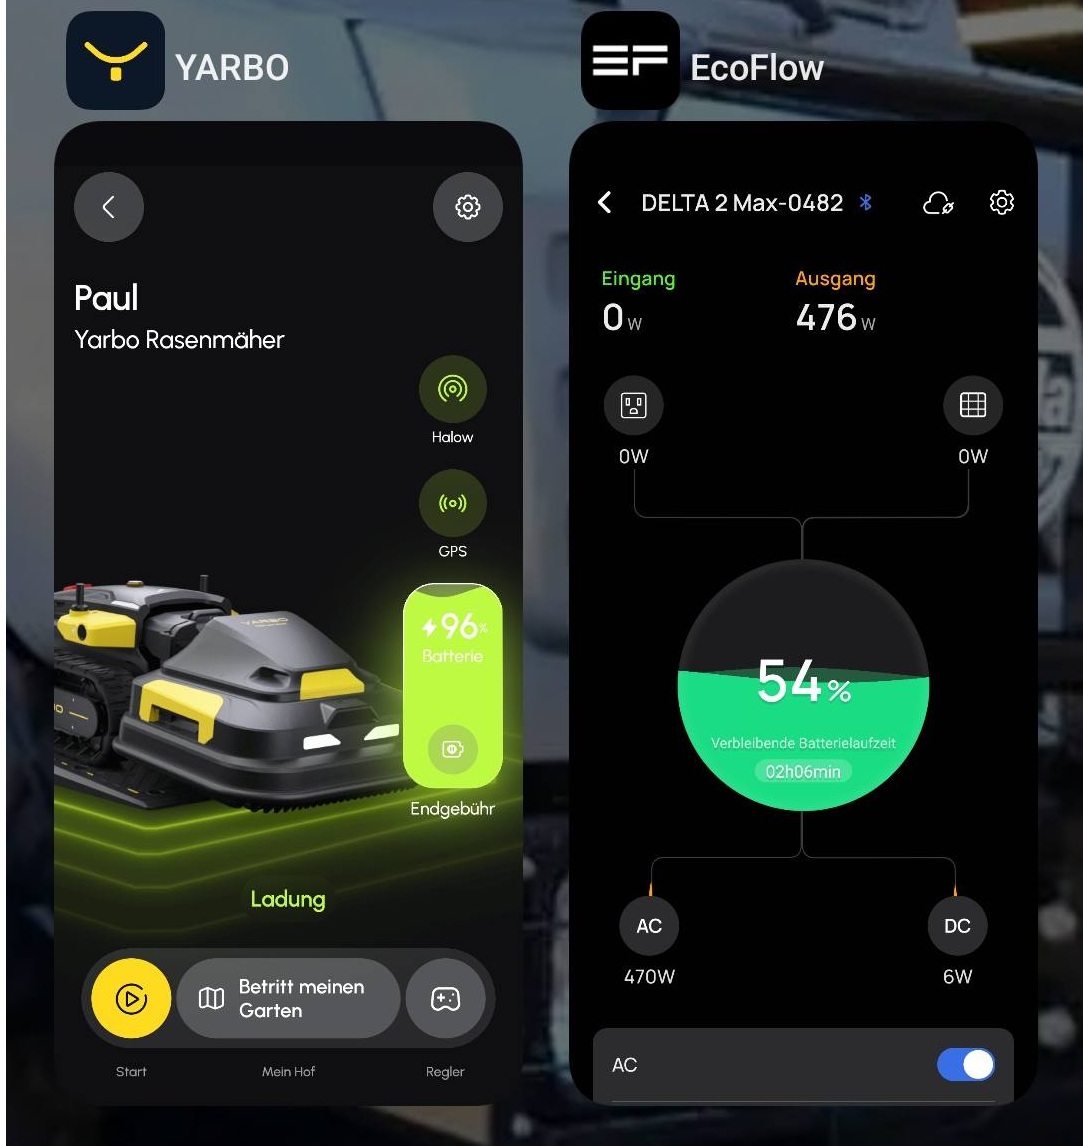
¶ Solar Charging
Perhaps you'd like your Yarbo to be a little kinder to the environment. Or you have a Docking Station that's not near a mains plug and need to get power there. How can your Yarbo go solar?
Requirements and Solutions:
- ⇒ Mains AC output (voltage is based on the country you are in)
- ⇒ 600-800 Watts is used by the rover while charging, seems to peak around 700W (per zaped212 on the Forum with a 2023 core). Add a little buffer, say 1000W minimum. Von Tom notes this ramps up and down slowly, so the inverter's surge rating doesn't have to be huge.
- ⇒ The Docking Station uses about 4W when the rover is away, 20W when the rover is there but not charging.
- ⇒ Per zaped212, you are looking at 2kWh/day.
- ⇒ The rover's battery size is just under 1.4kWh. This (plus conversion and charging losses) is what you would need to supply an empty battery on a cloudy day or if you mow and charge at night. The typical 20%-80% charge you see during operation would consume roughly 830Wh.
The easiest solution to bringing solar to your rover is using a solar generator, of which there are many available (Ecoflow, Bluetti, Pecron, Anker, Oupes, Jackery, Zendure, …). Add solar panels to charge the solar generator for an off-grid solution.
You may also piece together your own solar charging solution using a solar charger/inverter, battery, solar panels, and wiring components. There are many manufacturers and a huge amount of information on the Internet if you would like to familiarize yourself with DIY solar solutions, including building a SAFE setup.
User Von Tom posted his configuration to the Facebook Community:
- Ecoflow Delta 2 Max
- Two monocrystalline 500W bifacial solar panels
- The configuration powers networking equipment, the PoE injector (Data Center power), and the Docking Station, and it's where the 600-800 Watt figure comes from
¶ Power Requirements In Real Life
How large of a solar setup you need is based on how you use your Yarbo. The important numbers to start with – Wattage used while charging the rover's 1.4kWh battery – were mentioned earlier.
If you mow every few days and need one charge to do it, your solar generator just needs to provide the 600-800 Watts to get the battery topped off, so look for something that can provide 1000W, and size its battery and solar panels depending on how much sun you get and if you mow at night.
If your mower is out constantly, consider how often it needs to charge and how quickly that can be replenished by the sun. Size your panels and battery appropriately.
If you're thinking the snowblower, consider how many times you will need to charge during a storm, the average number of storms in a week, and the sun hours you typically get in winter. The numbers you'd need for a viable solar charging rig for Yarbo can get a little big, especially if your location is fairly cloudy during winter.
Many solar generator manufacturers sell bundles with solar panels, making ordering and setup easy.
There are plenty of resources available if you'd like to go the DIY route. Make SAFETY your Number One Priority, please.
¶ Can Yarbo work without Internet?
Over Cell?
Away from the Data Center?
¶ Performing Without an (Inter)net
Yes, Yarbo will work just fine without going to the Internet for general, daily operations – mapping, mowing, snowblowing, and so on, once your configuration is set up. The rover and Data Center normally communicate over a local HaLow network and don't need anything else for day to day activities.
Internet is required for:
- Initial setup
- Firmware updates
- Yarbo Support to remotely diagnose and make corrections to your machine
- Features requiring updated data from the Internet like snowfall totals to advise the rover when to go out and do snowblowing
Press and hold the round Network icon on your Yarbo's main page briefly to display shortcuts for modifying your rover’s WiFi connection and enable/disable Cell.
¶ Your Rover's Cell Service
Your cell service is free for 2 years and is compatible with several carriers, so you'll likely have coverage. Generally it’s used for tracking if the unit is stolen, but it can also come in to play if the unit moves out of HaLow range, in which case it appears (from my experience) to be turned on automatically as needed by the rover. The SIM card is in the battery compartment. Yarbo detects most cellular providers globally.
Using your own SIM Card
You may insert your own SIM card, allowing you greater control over 4G connectivity and provider choice. If you would like to use your own SIM card, you'll need your rover's IMEI number.
To get the IMEI number, open a Support Ticket with Yarbo Support and include:
- The Serial Number (SN) of your Yarbo device
- A brief description of your request (e.g., “Need IMEI to activate 4G SIM card”)
Once Support receives your ticket, Yarbo's technical team will remotely connect to your device and retrieve the IMEI number for you.
¶ Stretching the Limits: Operating Across Town
Can you put the rover in the trunk and take it to your mom's house across town to map and mow her yard? The answer from Yarbo Support indicates there's a nice little surprise lurking in your Yarbo's capabilities:
Yes — Yarbo can operate at a location approximately 6 miles (or more) away from the HaLow base station, as long as it maintains a stable 4G cellular connection to communicate with the Yarbo Data Center. This allows for remote control and monitoring even when you're not near the home base.
Please note that operating Yarbo far from its usual environment may affect positioning accuracy, which can influence performance in certain scenarios.
If you encounter any issues during this kind of remote operation or would like guidance on optimizing performance in a new location, feel free to reach out to the Yarbo Support Center — we’re happy to assist.
¶ Quirky Things You'll Notice
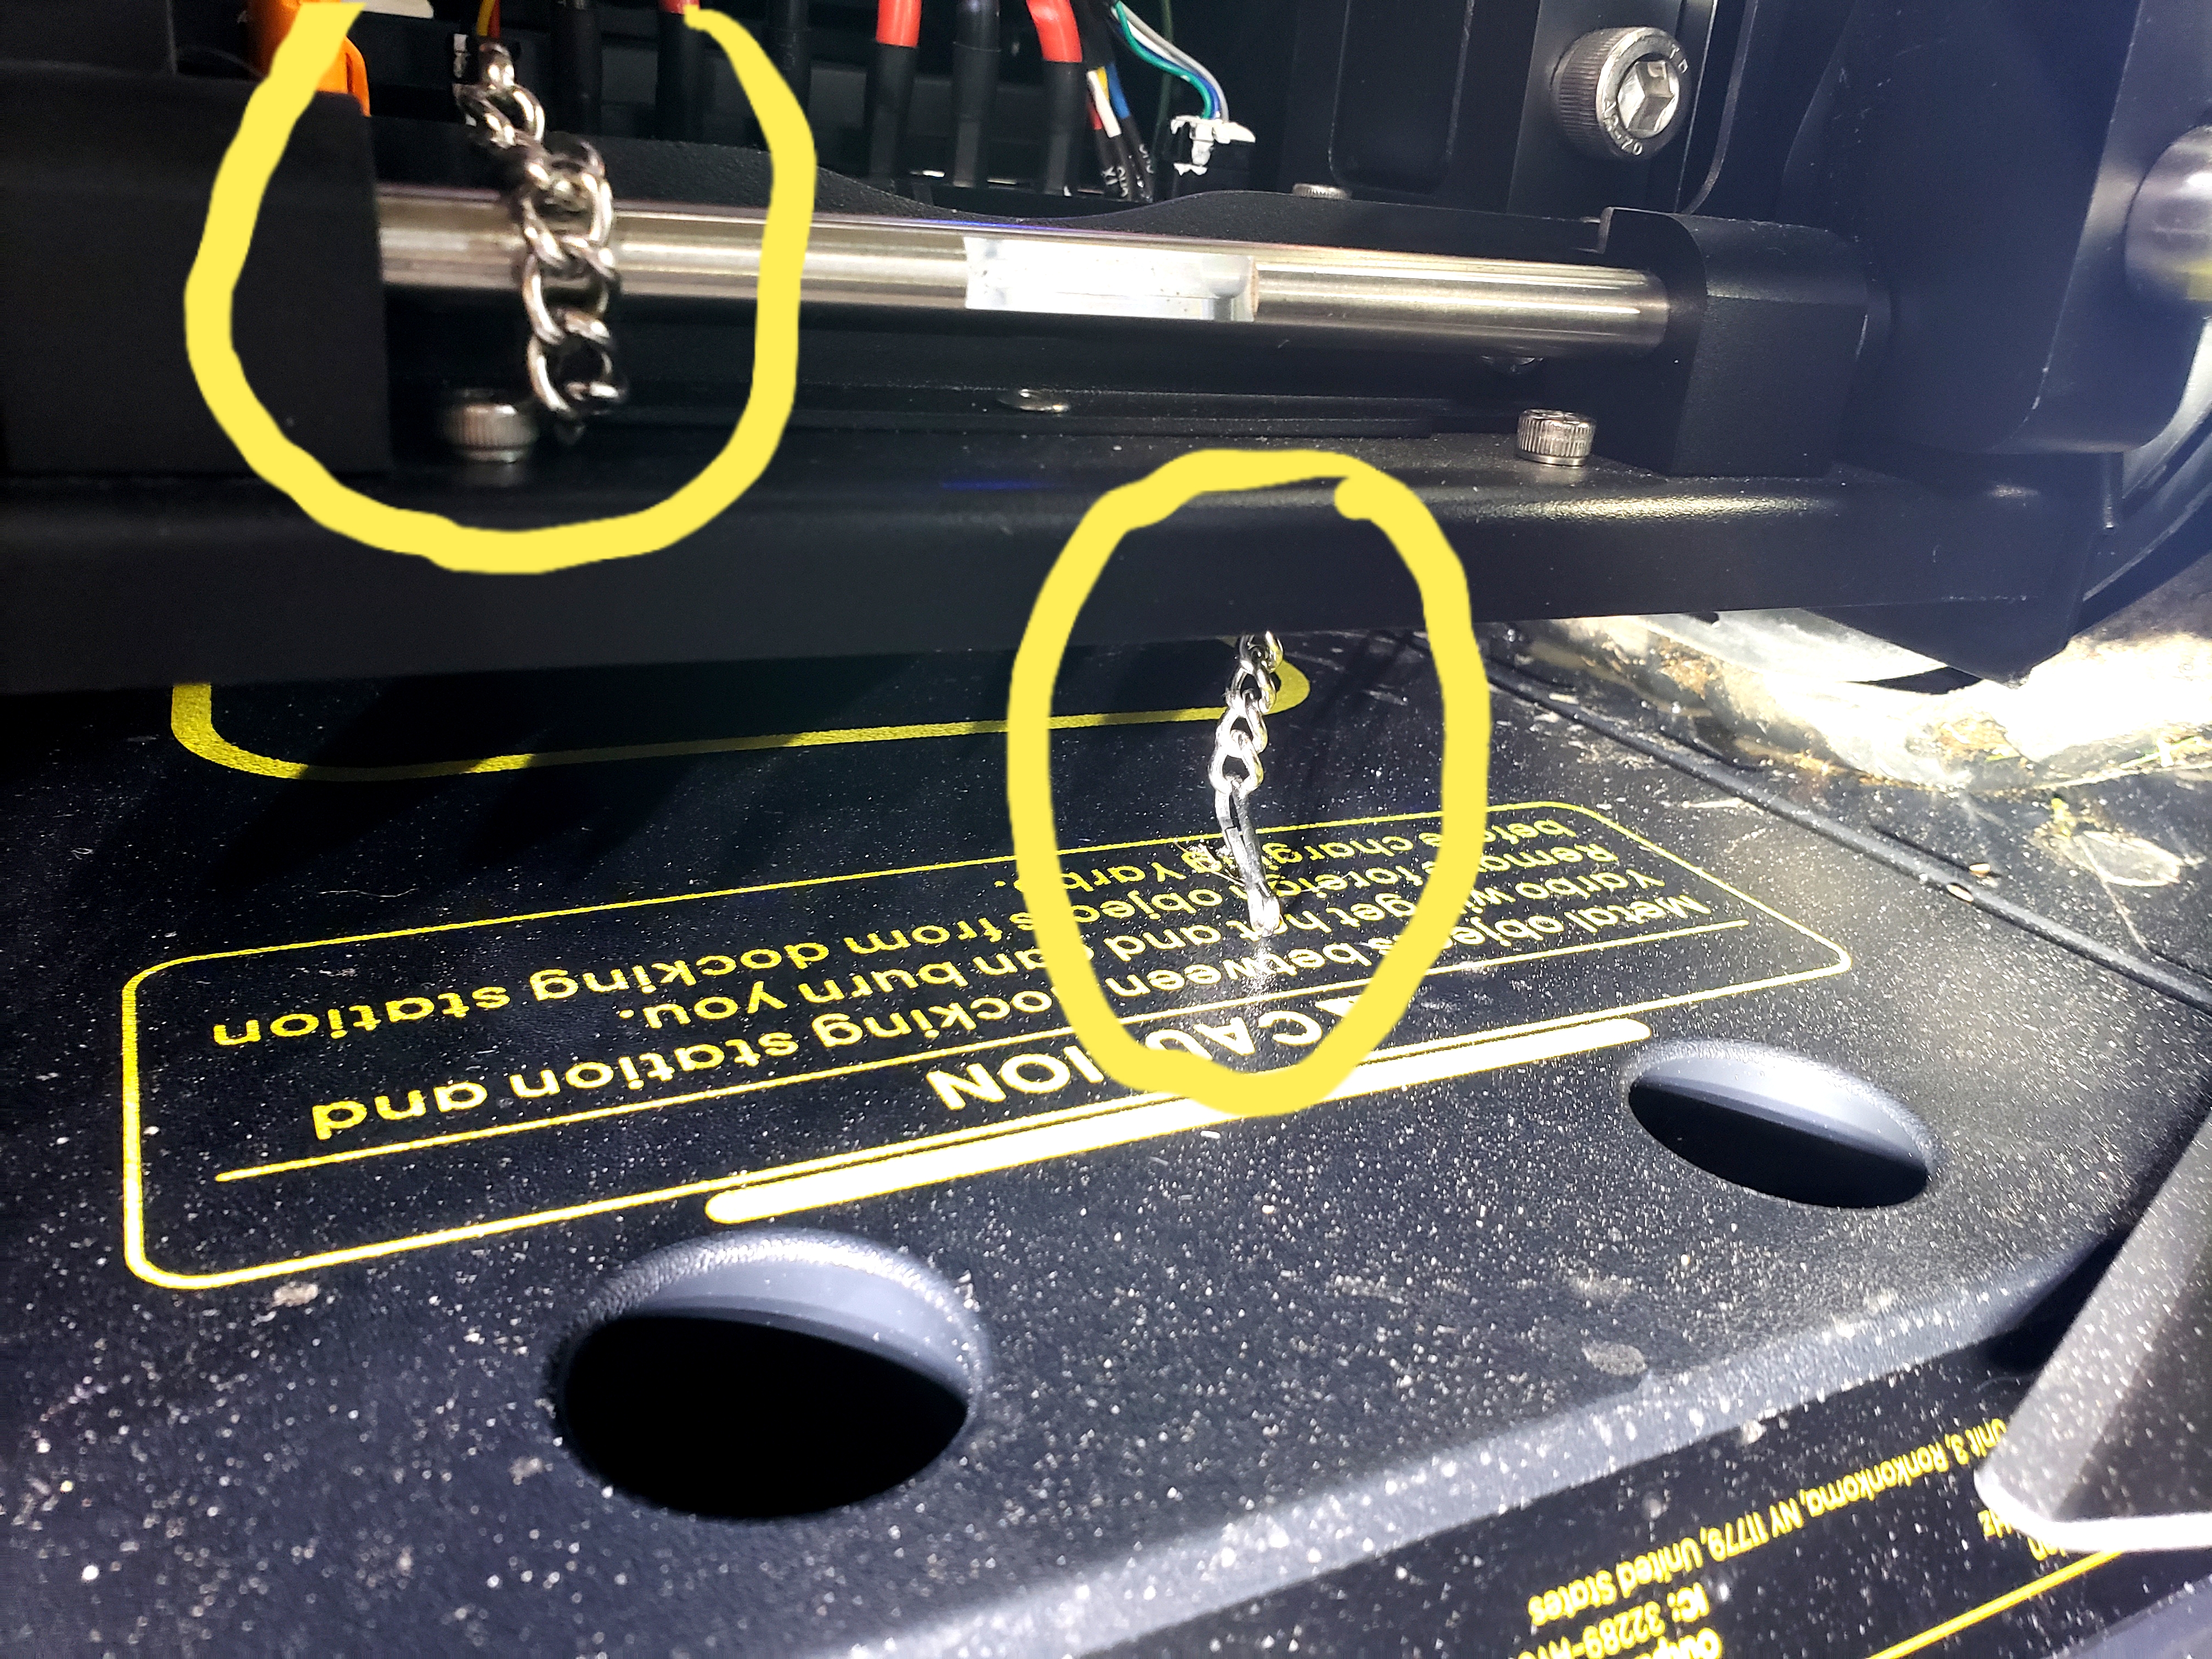
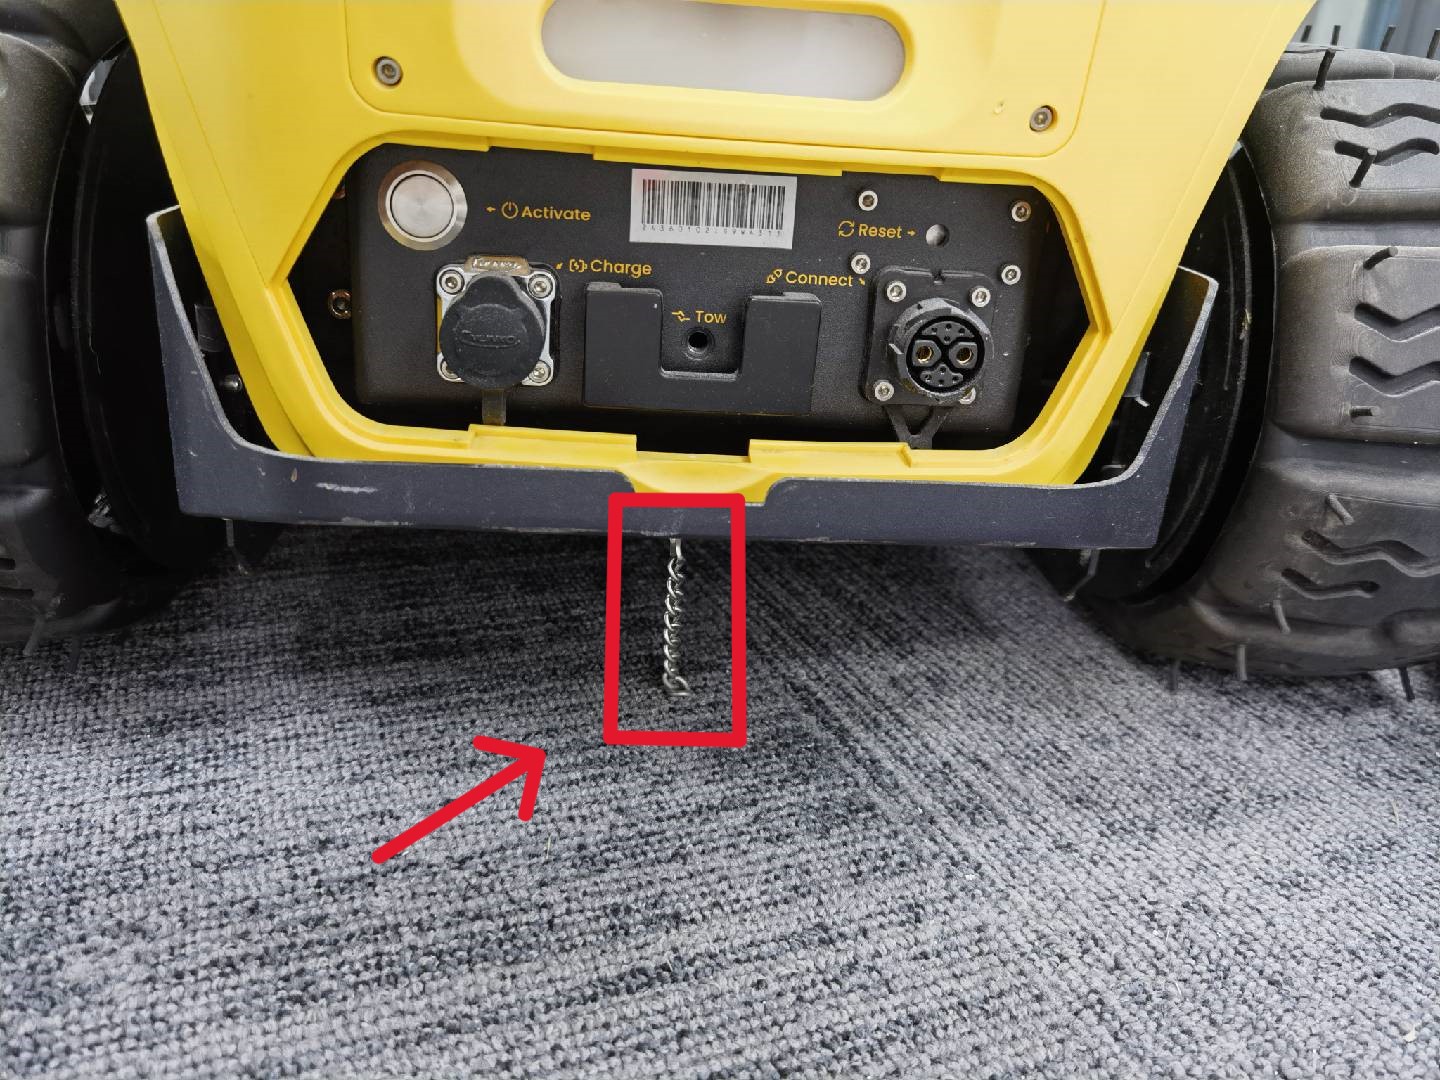
- The little chain that hangs down under the rover is there by design to help with electrostatic discharge. Do not remove it.
- That strange plastic block shaped like an “L” is a mower stand. You tip the mower up onto it when doing maintenance work. Bonus points if you can find it in the documentation.
- The SAM is held on only by the top pins, and it’ll be loose at the bottom. The Smart Assist Module (SAM) is the small module you get with the core. It clips onto the core with the top pins, and there are no latches with the bottom pins, so it’ll wiggle, and that’s OK. To remove the SAM from the latches press up on the bar at the bottom of the SAM to unhook the latches.
- There are side covers (side plates) for the tracks, and you may have a plastic set that came with the rover and a metal set that came with the accessories or a module. Why? It's a mystery! Yarbo may have discontinued sending out both already. Use the metal ones if you have two sets, as they're more robust.

|
Clicking the Start button – yellow circle with the arrow – doesn't start anything. So don't hesitate to click it to see what it does!
|
- Yarbo is Adjusting Module means the rover is adjusting the module lift actuator to keep the module’s clearance level consistent in changes in terrain.
- You can name your Yarbo whatever you like. Just not Kyle.
- Some users report their battery stops charging higher than 50C and resumes higher than 45C. The battery temperature indicated on the Diagnostics page is not the same as used in the charge/no-charge calculation. Yarbo is aware of this inconsistency. You needn't worry - the Battery Management System's got this.
- After a reboot your Yarbo may not start charging right away. It should start charging on its own when the battery charge drops below 90%. You can also go to your Yarbo's Main Page in the App and click the Big Battery Button to turn charging on manually.
- While on the Docking Station, the mower will lower its blades to the lowest point as a convenience for cleaning or swapping blades.
¶ Life With Yarbo - Specs & Tips

Big specs: One Data Center has a range of 32 acres in ideal conditions. Also in ideal conditions the rover can mow 6.2 acres a week…twice, about 1.7 acres a day.
Yes, it's true. Click the power button on the back of the rover for about 2 seconds and watch for the lights to go blue. Pair your device to Yarbo Music to use the rover's Bluetooth speaker.
Yarbo is designed to live outside 24/7 within specified temperature ranges. This has been confirmed with Yarbo Engineers. People do move Yarbo inside temporarily in extreme weather/hail/heat/cold. I sometimes move mine into the garage in bad winter weather and put it on the wired charger, then drive it out manually into the driveway to start the snowblowing Work Plan. Up to you - Yarbo is designed to hang outside on its Docking Station sun, rain, or snow. If there are temperature extremes beyond the specifications and you can’t get the rover out of the extreme cold or heat, grab the battery and keep that comfortable.
Yarbo will move the snowblower’s chute and turn the auger periodically while idle to prevent snow/slush from freezing the workings of the machine. If you remove the battery to bring it inside during extreme temperatures, get all the snow and slush out of your snowblower so the auger and chute won’t freeze up.
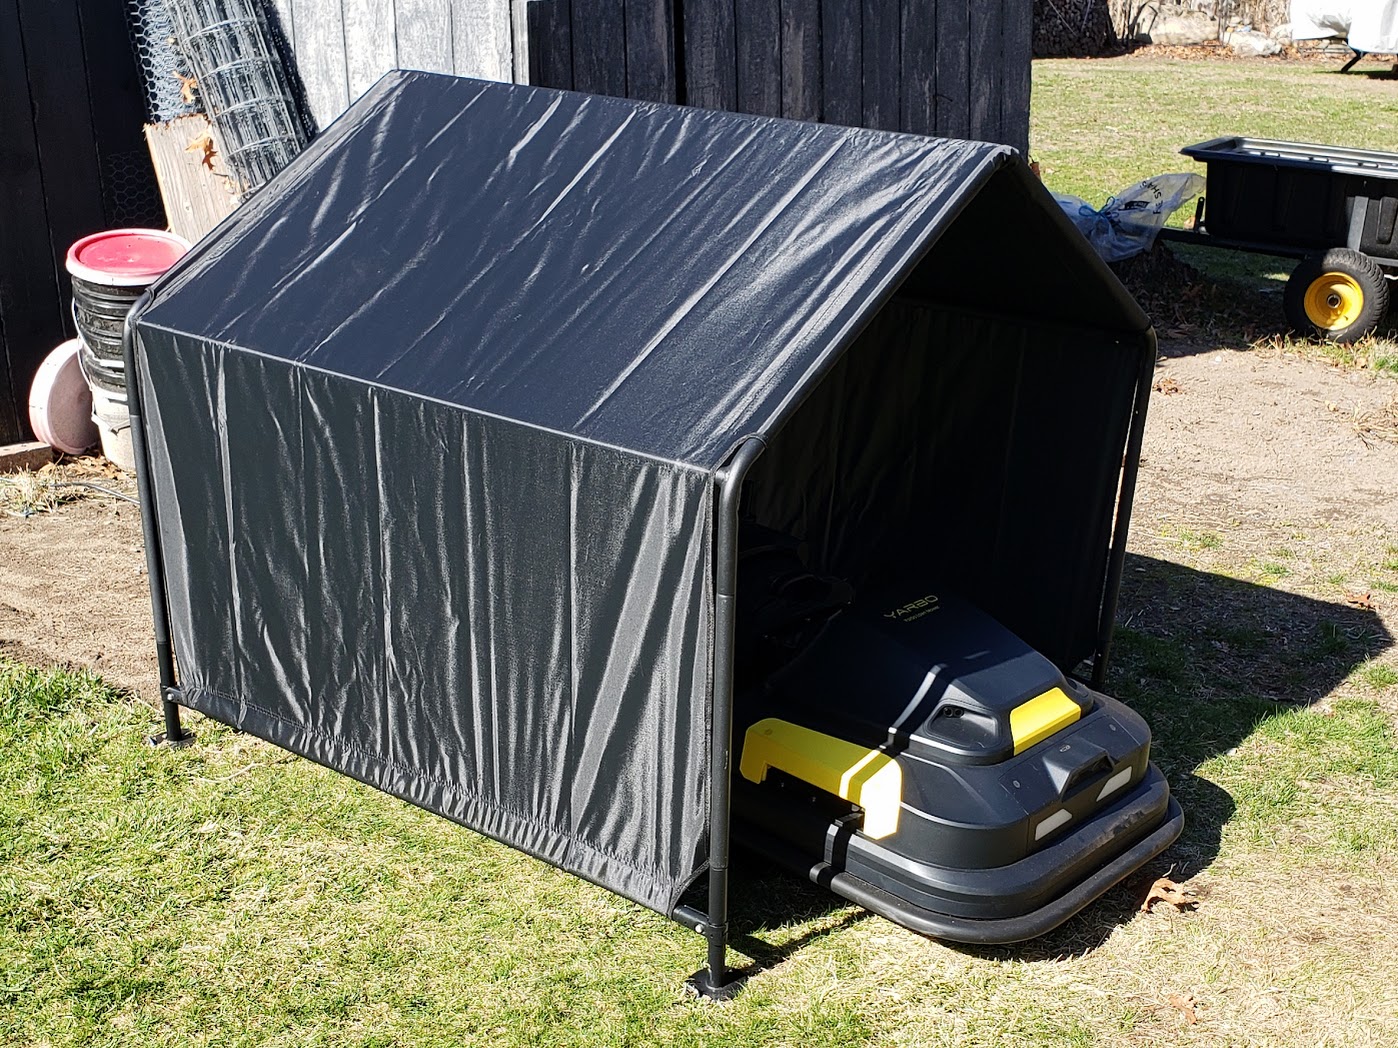
Some folks put the Docking Station under a “large tarp doghouse” (it’s an open tent, basically) which is fine, but make sure it won’t block GPS. Careful with the snowblower, which has the tall chute and (now optionally) clears the Docking Station when it returns to charge.
Running Work Plans without GPS at your Docking Station: You can put your Docking Station inside a structure, like your garage, and have your rover live inside. If no GPS, you don’t need to install the Docking Station in the App. Manually drive your rover to a mapped Area and start your Work Plan. As long as the rover can get to where the work is through your map, it’ll go on its own. When the Work Plan is done, it will stop. Manually drive the rover back to the Docking Station (or wired charger) for it to charge. SmartVision is great for driving your rover around manually.
Plans for your Yarbo and Home Automation, per Yarbo Support:
[…] Our R&D team is actively working on smart home integrations, including future compatibility with platforms like Alexa, Google Home, and potentially Home Assistant, based on community interest. While these features are still in development, we hope to bring them to users in a future update.
Do not “hot swap” modules. Power off first. Shut down the rover/core using the App or by pulling the battery cable (recommended for safety) when you swap modules. In addition to the safety aspect, if you “hot swap” modules (with power up), the cameras may not work, and the new module may not be recognized. So shut down the rover’s power before detaching or attaching a module. To power it back up, make sure the battery is attached and click the power button in the back under the hatch cover.
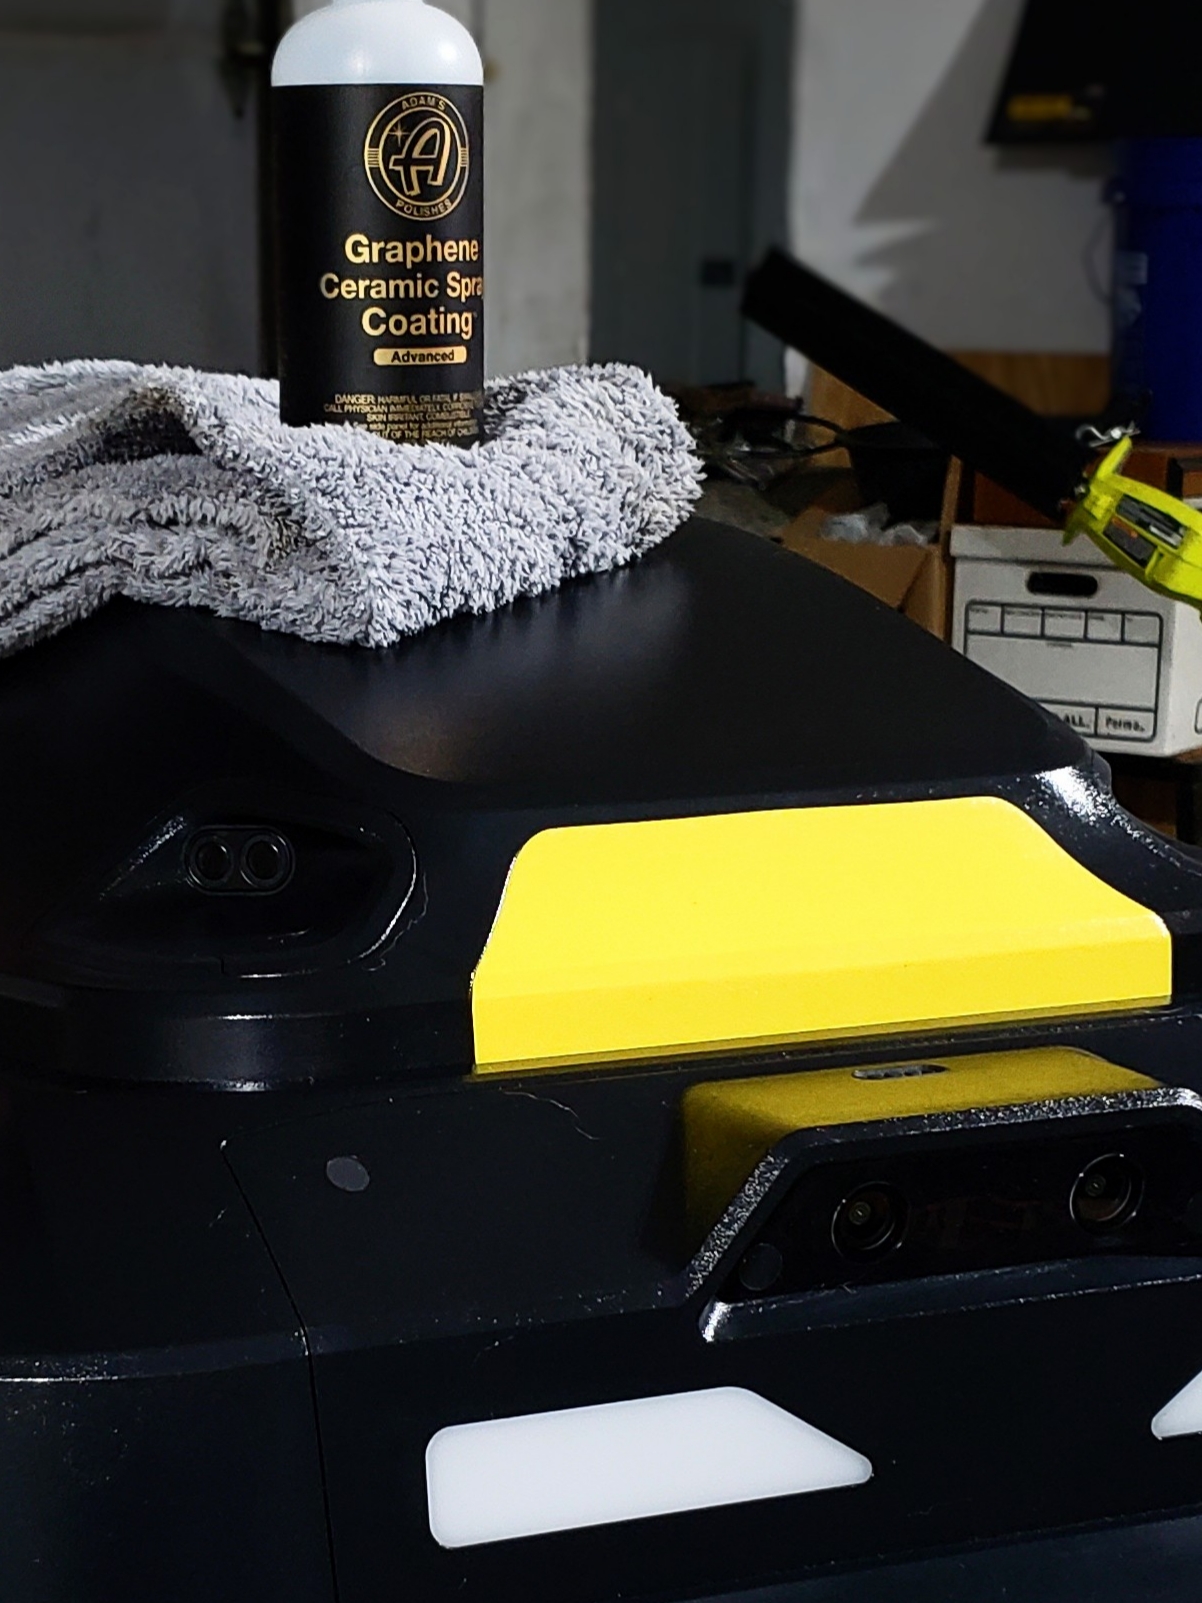
You may use a ceramic coating under the mower deck and inside the snowblower bucket and chute on pretty much everything to keep things less sticky and more slippy. Product Pioneer Scott G. recommends Adam’s Polishes. You can also ceramic coat the exterior of the machine to keep it spiffy.
NOTE: Yarbo recommends avoiding putting ceramic coatings on cameras, sensors, or antennas. Users have reported that it's usually not a problem, so if you “oops!” with the overspray, you'll probably be fine and just that much more spiffy.
¶ Rain Sensor
- The rain sensor on the mower works…but doesn't work. You can see the rain sensor value under Rain Detection on the Diagnostics screen. Unless you clean your rain sensor religiously, it will rarely register above 200, and most often it's far less even in a pouring rain. Folks have observed there are two versions of the sensor as well, each with its own sensitivity. In addition to the sensor being somewhat inconsistent, it measures the water in the sensor, not how wet your grass is. The default threshold to keep the rover from mowing is 1000, which your sensor is unlikely to hit.
OK, hold on, that makes the rain sensor useless, right? Maybe not. Here's how I'm using the rain sensor:
- Rain Detection ON. That setting goes back to ON after a reboot, so you may as well get used to it. (I don't know if Yarbo has fixed that or will do so.)
- Rain Sensitivity (threshold) 70. My sensor bounces from 3 to 50-something when the mower is out mowing, even on a sunny day. Observe your sensor's values on the Diagnostics page, and go by your sensor. I figure that if I get some rain, the sensor will pop up to 70 at least, and the mower will stay home or pause a running Work Plan.
- You can set Rain Sensitivity to 1000, and it's likely the mower will always mow, because unless you have cleaned that sensor well, it's not going to hit 1000.
Note: Yarbo added the Adjustable Rain Sensitivity to the App in response to a discussion by Yarbo Owners on the Forum, giving us a tool to help us manage this feature. Yarbo is reading and does consider our input.
¶ Maintenance, Software and Hardware
¶ App & firmware updates
- You update the App and the Data Center firmware manually. Yarbo updates the rover firmware. Get your entire configuration set up and updated (including the rover powered up and network-enabled) and let the rover sit idle on the Docking Station with your App closed, and after a while Yarbo should send the firmware update. If you don’t see an update after sitting overnight or so, contact Yarbo Support. The rover will reboot and announce “Ready to work!” after a firmware update, so be prepared for a spooky voice in the night.
The big hardware maintenance items on the Yarbo aside from cleaning are applying Track Grease and replacing Mower Blades.
- How long track grease lasts “depends” on your rover activity, of course. Yarbo requires silicone-based track grease so the nubs on the tracks ride smoothly on lugs on the drive wheels. For me the grease lasts just under a month with the mower. With the snowblower it was a short season, and I didn’t do anything with the grease from the factory but will grease up the snow tracks when I put them back on. You’ll know it’s time to grease up the tracks when you hear a thumping sound as the tracks go around, especially when turning. It happens more often as the grease is used up. See Yarbo’s web site for the recommended grease.
- Applying track grease can be done by removing the tracks and smearing grease on the nub faces and down the center, but many people leave the tracks in place and use a grease gun to get the grease onto the center of the track in-place, drive the rover forward a few inches, apply more grease, and continue until grease is applied all the way around the center of the track. Quick and simple. If you remove the tracks, take the time to clear out any debris you see.
- How long blades last “depends” on your mowing activity, of course. I think the “average” is 2-3 months per hole in the blade. You’ll get maybe a month or just a tiny bit more from one edge of a blade. Maybe. You’ll need to check for sharpness. When the edge has dulled, start using the other blade edge by swapping the discs, which rotate in different directions. You can also remove and swap all the blades, but swapping the discs is quicker. After both blade edges are used up, flip them to use the 2nd hole (if your blades have two holes), or replace them. Yarbo includes extra blades.
¶ The Battery
If there are temperature extremes beyond Yarbo's specifications and you can’t get the rover out of the extreme cold or heat, grab the battery and keep that comfortable. There is a Battery Power Cord available on Yarbo's Accessories Page you can purchase that allows the battery to be charged and maintained by the wired charger supplied with your Yarbo.
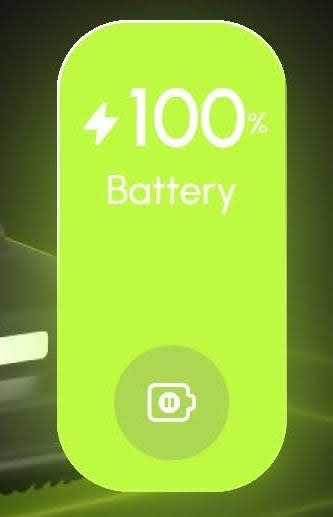
Yarbo is designed to be Charging when not working. The battery management handles it, so don’t worry. Your App should always say “Charging” when the rover is on the Docking Station or wired charger. When the actual battery level exceeds 90% but the app displays 100%, your Yarbo is in trickle charging mode.
- There is a battery heater that is turned on in cold weather.
- The rover continues to receive GPS signals and communicates its position to the Data Center, which leads to continuous power consumption.
- Core electronics and modules used for management and communications also draw a small but steady amount of power when idle.
Battery Management stops rover operations with high temperatures. The BMS watches the temperature of the battery, which you can see on the Diagnostics Page (it’s in C). When the battery temperature exceeds 50C, the rover will stop operating or charging until the temperature drops to 45C. Usually while out working the rover's battery temperature stays below 50C, but during charging the battery may climb in temperature. The Battery Management System handles that for you.
|
Battery charge indicators tell you the state of charge of your battery:
|
|
¶ Battery Percentage Stuck?
If your battery % indicator is stuck at less than 100% despite having plenty of time to charge fully, the BMS (battery management circuitry) needs to be reset. As noted in this solution on the Forum, unplug your battery for about four hours. When you plug it back in, Bob's your uncle.
¶ Automated Charging
- Automatic Recharge during a Work Plan: Yarbo automatically returns to charge as needed while running a Work Plan. Under Working Preference you will find the following options:
- Recharge Battery Level: When the rover's battery reaches this minimum level, the Work Plan is paused, and the rover returns to charge.
- Undock Battery Level: If the rover has gone to the Docking Station automatically, it will resume the Work Plan at this battery charge level.
- Sending the rover to charge manually during a Work Plan: You may pause the Work Plan and click Recharge in the controller in the App to send the rover back to charge manually. Resume the Work Plan manually through the App when the battery has charged.
- There are some conditions where the Yarbo won't resume a Work Plan after recharging to the Undock Battery Level.
- You canceled the Work Plan.
- You paused the Work Plan and pushed the Recharge button on the controller in the App to send the rover back to charge early. You will need to resume the Work Plan manually.
- The Schedule, if you are running one, has reached the End Time. When that happens, the Work Plan is canceled.
- The Battery Management System (BMS) has determined that the battery needs to cool down a little.
- The rain detector was triggered. Yarbo will pause the Work Plan and go out when the rain sensor drops below the Threshold you have set.
¶ The Yarbo App
¶ App Main Page
- Your Yarbo's main page shows the name you have given it and what module is attached.
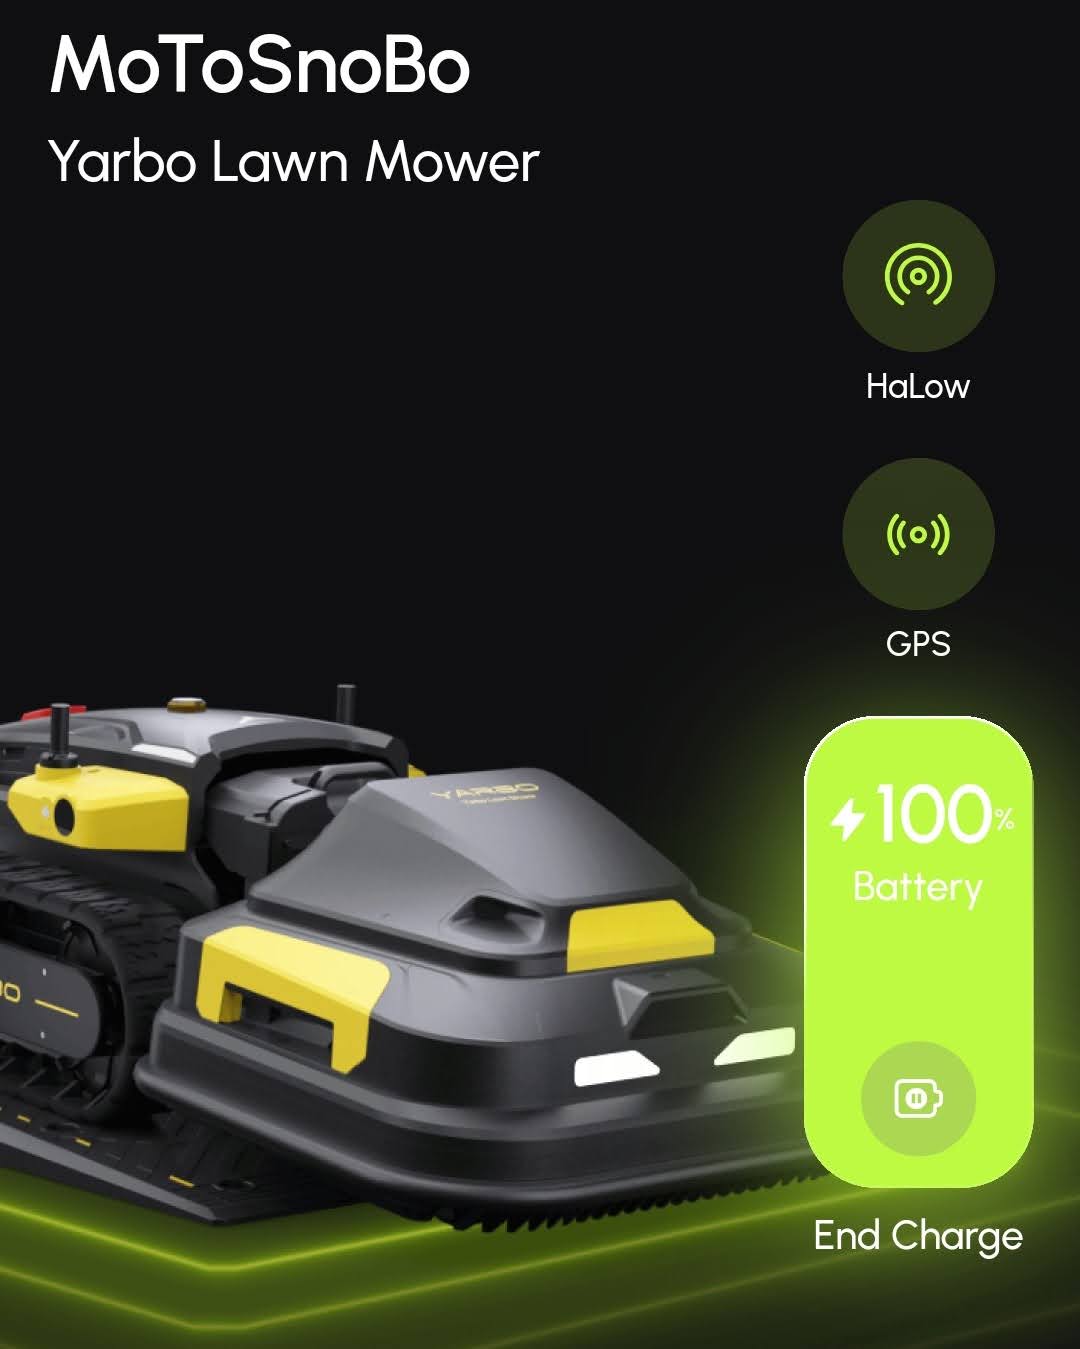
- The round “Network” icon shows Bluetooth, WiFi, Cell, or HaLow. What it shows is “ovlerloaded” (means different things depending on what is shown):
- When you’re connected to the rover via Bluetooth, the icon will indicate the Bluetooth connection.
- In other cases, it shows how the rover is accessing the network, whether through HaLow, Wi-Fi, or 4G.
Hold down the button to see configuration information and options.
- The GPS icon shows GPS status, green is good, gray or red bad, yellow so-so. The rover will neither start a Work Plan nor be able to map unless GPS status is green. Hold down the button to see additional status information.
- The Big Battery Button indicates the charging status and battery percentage. Click on it to start or pause charging.
¶ Mapping, Work Plans, Schedules, Settings, and more
¶ Maps
The rover has ONE map. The map is shared by ALL modules. You will notice different mapped items and Settings when you swap modules.
- The basic mapped item is the Area where each module does its work.
- Pathways provide navigation among Areas.
- No-go Zones tell the rover to stay away.
These three things are shared across all modules. There are module-specific items you may add to a map and are hidden when you swap modules.
Some capabilities are module specific. Follow Me and Patrol Mode are Smart Assist Module only, for example. Yes, there's a big lobby to have Follow Me added to other modules. I think it has come to or will be on the leafblower.
- Maps are stored in the rover. Multiple rovers may not share the same map.
- You can save the map as a kind of checkpoint using Save Current Map in the App, but it doesn’t save Settings, Schedules, or Work Plans. There is no good way (currently) to “back up” your map with all the other items and restore it intact. You cannot “clone” your map to another rover yourself; Support must be involved, and they will warn you it may not work, including for a replacement core, so try but be ready to re-map. If your Data Center moves or you reinstall it, you must re-map.
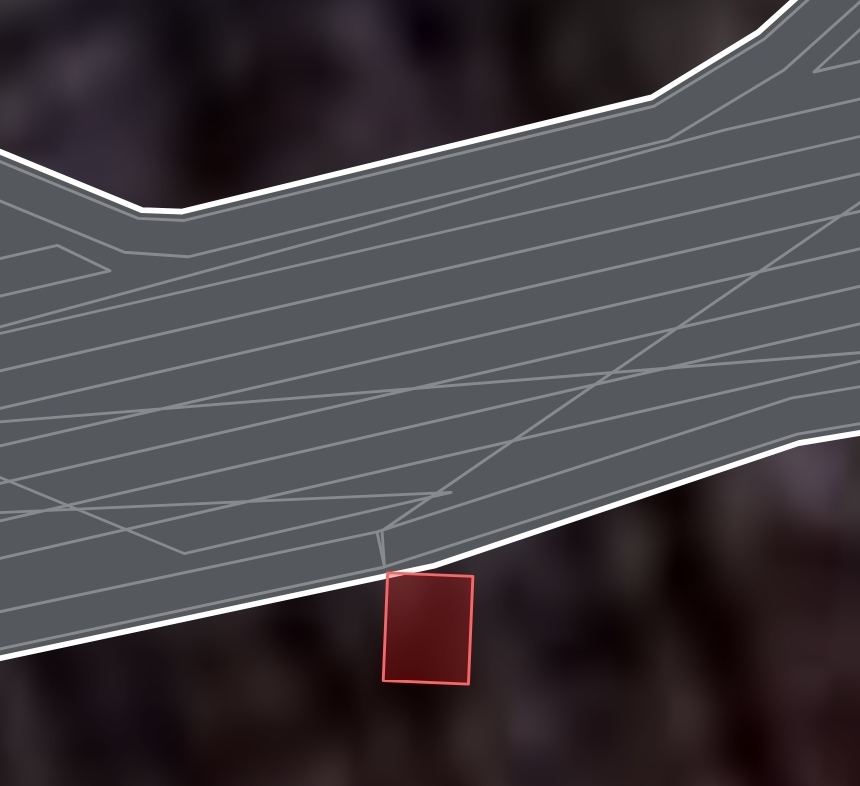
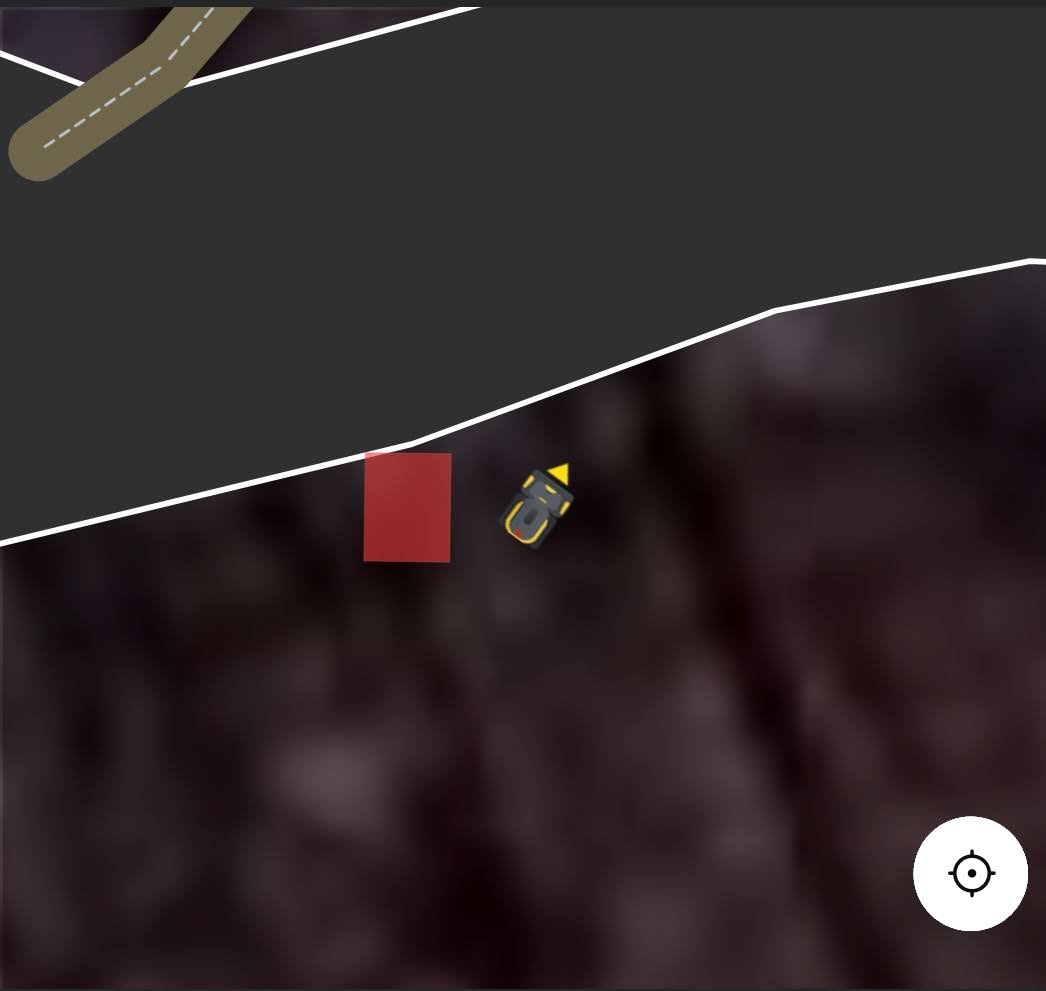
Your Docking Station must not be within an Area. Do not map an Area around your Docking Station. Place your Docking Station somewhere off to the side.
- Moving and reinstalling your Docking Station will delete your Pathways mapped from the Docking Station, all Work Plans, and all Schedules. Make notes and re-create. Other mapped items and Settings will remain intact.
- You can put a Background on a map. Enter My Yard, click the three dots in the upper right, Background. Move your selected Background image, pinch-zoom, pinch-rotate, and line up the image as best you can. A Google Satellite image will get close but not be exact due to different angles and geometric distortions, so do a best fit.
- Mapping strategy: Up to you! You likely already mentally break up your property into separate smaller mowing (or snowblowing) sections that “make sense” in your mind. These smaller sections can translated into Areas in Yarbo’s map. It is possible to have one huge Yarbo map Area covering your whole property, but mapping smaller Yarbo map Areas is recommended as being more flexible and easier to manage for Settings and Scheduling. My own Yarbo mowing map reflects how I mow my property in sections with the riding mower. I also use the “Chaining” technique described in “Navigation strategy” and have few very long Pathways.
- Can I map with one module and use another? Yes, but it's not really a Best Practice. You can do this because the rover has the GPS smarts, not the modules. It is recommended that you map with the module you will most commonly use in that location:
- Mapping with the most appropriate module allows you to account for the size of the module.
- Mapped items are available based on module. Deadends for the mower, Sidewalks for the snowblower – and so on. If you swap modules, you will not see module-specific items on the map anymore, and you will not be able to create a mapped item unless the attached module supports it. Areas, Pathways, and No-go Zones are shared by all modules.
- Can I map an Area boundary straddling the driveway and the front lawn with the mower to cut the edge? Absolutely, as long as the height difference isn't too much and you risk hitting the cutting discs or blades. Also watch out that the rover won't be too close to vehicles.
- Edit Area allows you to change the boundary of an Area by removing slices or adding chunks. It is not possible to split an Area and keep all slices, however (an enhancement for that has been requested).
- What point on the rover determines the map line? The center of the core between the two RTK antennas is the mapping reference point. Leave adequate room for the rover to turn, and be aware that it can back up as well while doing its work. It’s best to map the same way the rover works, so study its habits, and refine your map.
|
No-go Zone notes:
|
Navigation strategy: The rover will calculate its navigation based on Areas, Pathways, and one-way Sidewalks (snowblower).
- Chaining: You create at least one Pathway from the Docking Station to your first Area, and then you create Pathways from Area 1 to Area 2, Area 2 to Area 3, and so on. This is called “chaining.” It’s the way people most often create their navigation for the rover.
- Multiple Pathways from the Docking Station: If you don’t want to do chaining, you can create a Pathway from the Docking Station to each Area separately.
- Combination: Yes, you can use a combination of navigation strategies. As long as the rover can get around, it’ll figure out how.
- “Hub Area” strategy: A central Area with one Pathway from the Docking Station and many Pathways leading out across your property.
- Sidewalks: A snowblower’s Sidewalk can be used like a Pathway and will go one-way if it starts on one mapped item and ends on another. The neat thing is you add the Sidewalk to the Work Plan so it always gets done, unlike Pathways, which may not get done if the rover finds a shorter navigation path.
- Pathway endpoints must not be in the overlap of multiple Areas. Create a Pathway by starting it in the “meat” of an Area a few feet in and ending it in the “meat” of another Area a few feet in. Starting or ending a Pathway in an overlap of multiple Areas should be avoided and often doesn’t work as expected, sometimes working, sometimes not. (Yarbo may update the behavior of Pathways started or ended in Area overlaps to be more consistent.) Pathways may go through overlaps and may cross multiple Areas, but long Pathways have been associated with navigation anomalies, so it’s best to use chaining and keep Pathways to a reasonable size. Avoid creating Pathways through No-go Zones, as Pathways and Deadends ignore No-go Zones.
- Deleting Areas unhooks Deadends, Sidewalks, Pathways. If you delete an Area where Deadends, Sidewalks, or Pathways start, those items will no longer be usable need to be deleted and re-mapped, even if you map another Area back over them. (Unknown if Yarbo will change this behavior.)
¶ Managing Overlapped Modules – Snowblower + Mower
As there is a single map used by the rover, if you have more than one module, you may need to create Areas that overlap. I snowblow across my property, so all those Areas, Sidewalks, and Pathways were mapped. Then it came time for the mower, and now the snowblower mapped items are overlapped.
Mentioned earlier are the issues that can arise in overlaps, especially with Pathways, which become difficult to manage. Yarbo is looking into how maps handle the various modules the rover can use, the most likely combo needing sorting being the snowblower and mower. Per Yarbo Support (July 2025):
Our R&D team is currently developing a feature that will allow users to filter and manage maps by module, helping to prevent overlap between mowing and snow blowing zones. This enhancement is planned for a future software update, and we’ll be sure to announce it once it becomes available.
¶ Building A Work Plan
When you have your Map created and are ready to mow, for example, you create and execute a Work Plan. From your Yarbo's main page, click the big yellow Start button with the arrow in it. This is where you create and edit your Work Plans. Add Areas, Deadends (mower), and Sidewalks (snowblower) to your Work Plan by turning the checkbox on in the list, and press the three lines to change the order the items in the Work Plan will be executed.
- Deleting a single mapped item deletes the Work Plan. Remove your mapped item from all Work Plans before deleting the mapped item. If a Work Plan contains an item that you delete, the Work Plan is deleted. (Yarbo may change this behavior.)
- Yarbo rovers are not federated and do not coordinate activities or maps. You will need to coordinate multiple rovers through the way you map and schedule them to avoid the rovers being in the same place at the same time. Although some people do find the jousting and near-misses entertaining.
¶ Scheduling
- The Scheduler can be accessed in the App where your Work Plans are listed.
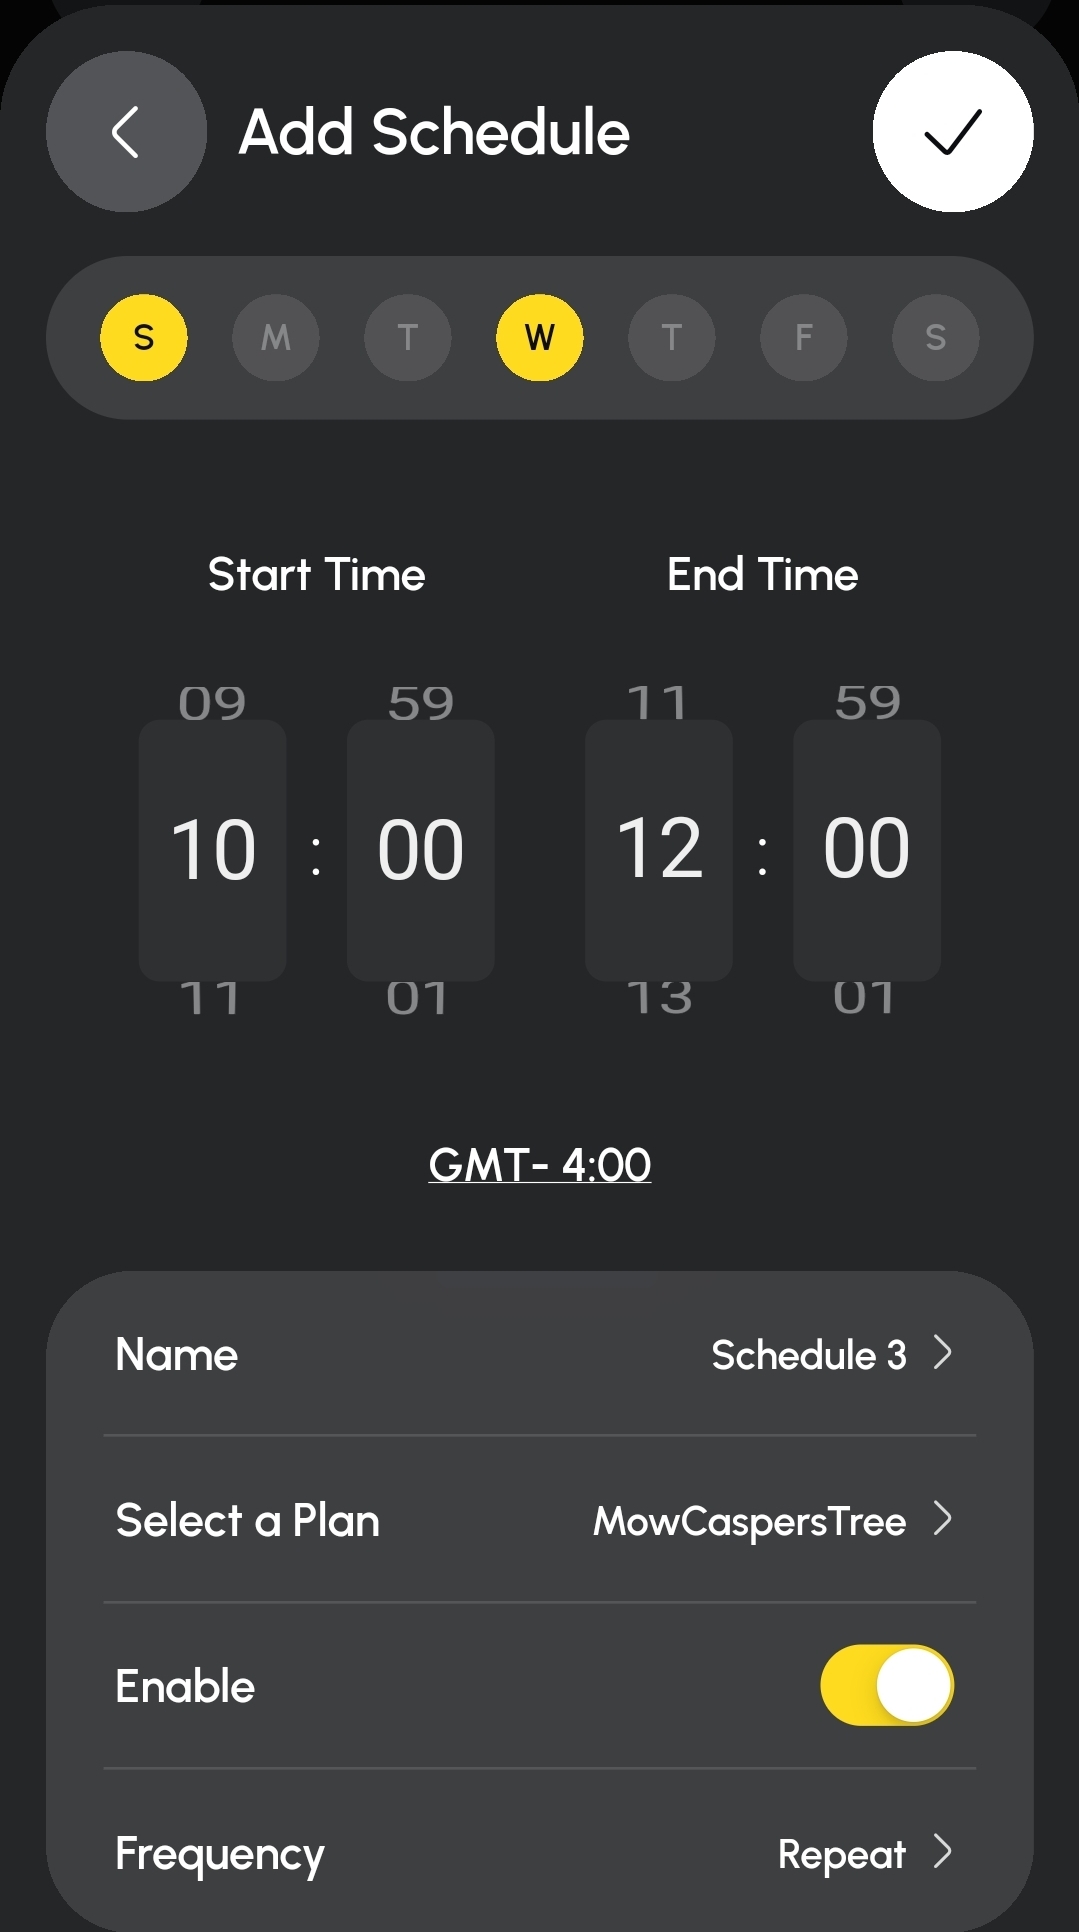
The Scheduler works on 24-hour time slots over 7 days. A scheduled job comprises a Work Plan and a Day, Start Time, and End Time. When you create a job, you must include an End Time, and the longest job you may run is 24 hours, which includes rain delays, travel time, and recharging. When the job reaches the End Time, the job is cancelled; the job is not paused or resumed the next day. Try to fit that job within a 24 hour period by adjusting the amount of work (usually the size of the Area).
¶ Best Mapping Practices
Map with the module you will most commonly use in that location.
Map Areas and No-go Zones with the primary (left) antenna toward the work. The primary antenna is on the left side of the rover if you're standing behind the rover.
- The primary antenna should not be against a wall or structure when mapping. You want the best GPS signal.
- This means you map Area boundaries “counter-clockwise”, No-go Zone boundaries “clockwise”. This is also how the rover moves along the boundaries when working, meaning you're going to have better turns that the mower can handle.
Start small when learning mapping, create mapped items to experiment with and learn from. Get to know Areas, No-go Zones, and Pathways especially. Create a Work Plan and run it. Everything else starts from there. You can delete these experiments when you’re ready. You WILL re-map your “official” Areas, Pathways, Deadends (mower), and Sidewalks (snowblower) several times. And that’s OK.
“Walk the yard” before you send any autonomous tool out to do work for you! Make sure your robotic assistant's work area is free from obstructions and the machine will be able to operate safely.
Be patient with yourself and the machine. It is a complex product.
¶ Yarbo In Action
¶ Snowblower
¶ Stacking up: Yarbo vs. A Worthy Competitor
How does the Yarbo snowblower compare to one of the industry's standards, the Ariens Compact 24? Even Yarbo's CEO Allen said the Ariens is a great benchmark to reach for. I have both the Yarbo and an old Compact 24, same width bucket, both 2-stage. So, you'd like a comparison aside from all the blah-blah about not having to deal with gasoline, oil, carbs, spark plugs, or drive discs? And that one is automated but the other isn't? Fine.
With powder to moderately wet snow and even heavy snow that's not too wet, they're about on par. Moderately-heavy to heavy-heavy snow with increasing moisture content the Ariens pulls ahead a little while the Yarbo can still hang in there but can start to struggle. There is programming in the Yarbo to sense the snow coming into the bucket and adjust the power to the auger and drive speed, and it can chew on the snow, sometimes starting to clog the chute. You may even start wrasslin' with the Ariens with this heavy stuff, too, but it usually throws it. Garbage slush – a few inches of the worst water-logged stuff - the Ariens can gurgle it out as best it can and maybe throw it a few feet, but you may notice the Yarbo's chute being clogged.
Garbage slush or the small stuff, that's when you might want to reach for Yarbo's secret winter weapon: The Snow Plow Blade, which you attach to the front of the snowblower to push snow off to the edges of your driveway autonomously.
In sum, the Yarbo is about “a notch or so” away from the Ariens, and some of the tricks below will help you close that gap.
¶ Preparation
A few ideas to set up your Yarbo snowblower for the best results:
- Ceramic coating. Yarbo Product Pioneer recommends Adam's Polishes, but you can use a good ceramic coating on all the metal parts in the bucket and chute.
- Protection Fence (Front grate). There for safety (or the lawyers, you pick), it is possible to unscrew the grate from the front of the bucket and remove it. Some people leave a bar or two and flip the grate over and put it back onto the bucket higher up so there is still some safety buffer offered by the grate. Up to you and your safety requirements.
- Snow Plume Diverter (Chute collar). There is a semi-circular collar in the chute opening that when removed will improve the flow of heavier, wetter snow through the chute. For powder snow it's best left in, for heavy stuff you can try removing it to see if snow throws better.
- Tracks and Traction: The Yarbo snowblower comes with Snow Tracks with studs.
- The ] (closed bracket) shape of the snow tracks faces with the flat side front when looking down at the tracks.
- Metal studs (screws) are installed in the tracks to help with traction on ice, but you can remove them using a bit provided in the toolkit. Some people do not want scratches on their driveway from the metal studs and remove them. Others have icy conditions and need the extra traction.
¶ Snow Blower Techniques
A few techniques for getting the best results from your Yarbo snowblower:
- Snowblow EARLY and OFTEN. Even after only a couple inches of snow it may be worth getting Yarbo out there to start a clean-up so it can keep up with what's coming down.
- Yarbo has a feature to check on the Internet for the snow totals in your area and send the snowblower out automatically.

- Get the snow in the bucket! A key to helping Yarbo's snowblower out is to ensure the bucket takes in the right amount of snow for the snow conditions. Adjust the forward speed and the auger speed so the chute is throwing snow well as the bucket takes it in without over-filling. If you still have the safety grate on the snowblower bucket, consider removing that, as heavy snow may not pass through the bars.
Sometimes you need to crank everything up and GO PLAID!
¶ Snowblower Game-Changers for 2025
Coming in at the tail end of 2025 are two new features to improve the functionality of Yarbo's snowblower in particular situations. They arrived a little too late for most folks to try out, but you'll have these for the 2025-2026 season:
- Slope Mode: Helps if you're snowblowing, say, a driveway that's a slope. It may also help those who wish to snowblow in one direction instead of doing all kinds of tiny turns (fingers crossed on that one) – we'll have to see how the feature was implemented.
- No-turn Sidewalks: The default sidewalk goes out, turns around, comes back. This change lets the Sidewalk behave like the mower's Deadend, going out and reversing to come back, no turns.
¶ Preventing the Yarbo Snowblower from Getting Stuck
- The Yarbo snowblower gets stuck the same as any snowblower when it cannot get traction or hasn't enough room to turn or move.
- Use the supplied snow tracks and (optionally) the studs for the best traction.
- The Yarbo Area Settings have an option to allow you to snowblow twice automatically at different auger heights, once at a higher setting and once at a lower setting. You can do two clearings in one job.
- Pre-clear the spots where the rover turns and can get hemmed in by snow or otherwise seems to have trouble, such as a small slope.
- If the end of an Area is often clogged with snow when the snowblower is working it and often needs a rover rescue, use a Sidewalk beforehand to clear out the spot where the rover turns while snowblowing that area. Snowblow the Sidewalk first, then the Area. This will give the snowblower some room to maneuver without so much snow all over the place.
- If you find that your rover slips in particular spots, it could be that it could get traction but is stuck pushing against snow. You'll need to make sure it can move freely, so consider some pre-cleaning options:
- Clearing near that spot first could help the rover gain traction if it doesn't have to push against extra snow.
- You could also use a higher bucket setting.
- Look at using the automated setting to snowblow it twice with two different auger heights.
- It's up to you whether you snowblow down to the pavement. Many people, including myself, leave a little bit and don't worry about it, especially across the property on the grass. As long as it's walkable, I'm good.
- Yes, you can snowblow across your property on the grass. I clear in front of a shed, in front of firewood stacks, clear around a camper, create double-wide Sidewalks and Pathways…you get the idea. I don't get the blade all the way down to the grass.
¶ Lawn Mower
M1 Mower (Original) vs. Mower Pro
Yarbo introduced the Mower Pro in 2025 as an option for those with tougher lawns to take care of: tough grass in less friendly environments. The Pro has the option of mulching blades similar to what you'd have in your push mower, and the Pro can use razors and discs as well.
To support the use of the mulching style blades, the Mower Pro has more powerful motors and increased rigidity in its structure. If you hit a rock, it's going to be OK.
- The original M1 Mower cannot be refitted with mulching blades. The mount is not compatible, and the original mower's structure and motors are not designed to handle the stresses and shock that a rigid blade can encounter.
- The discs supplied with the Pro are not compatible with the original M1 Mower.
The original mower remains fully supported, available for sale new, and a great solution (at a lower cost) for the majority of folks like me who have regular lawns to take care of.
But if you've got that tough lawn, the Pro's your go-to.
¶ How Often should you Mow?
The poor thing was perfectly clean before the day's work.
How often do you mow with Yarbo? “Just a little off the top!”
If you're using the discs with the razor-style blades, standard on the M1 mower and an option to use on the Mower Pro, think of Yarbo as a “maintainer.” It is designed to take “a little off the top” every few days.
- Make sure your grass is at a proper height that Yarbo can handle. If your grass is a little above Yarbo's 4" maximum, look at using the Target Height option, which will take the grass down from 4" to your desired height over a few mows. Or mow with your regular mower to about where Yarbo can take over, then send Yarbo out regularly from then on.
- Taking just the top of the grass is healthier for the grass. It's not as much of a shock as taking the grass down an inch or three…or more…(guilty…).
- The little bits of grass break down into fertilizer for your lawn more quickly.
- Bagging? What bagging?
This is a big change for us Olde-Timers who push petrol mowers around or go out in the blaring sun and ride around in the dust on our Craftsman 917-series riding mower from the end of last century. Where we'd begrudgingly go out and mow when we really had to, now you've got a Yarbo that can go out there for you and help improve your lawn instead of your twice monthly (if that) grass hacking sessions (guilty…).
You can use the Scheduler to have your mower go out to the Areas you want on a regular schedule. Me? I check to see if the grass is fairly dry from any rain or dew, look for “whatever looks shaggy," and start the mowing Work Plan for that Area, very manual.
I had mowed to a height of 2 3/8 inches in the past. Yarbo's Product Pioneers recommend leaving your lawn a bit longer – 3" to start, maybe a bit longer if your grass is under stress from sun, heat, and dry conditions. You can adjust the mowing height in the Settings for Areas, Pathways, and Deadends (there is currently no “global” setting for grass height - it has been requested).
Largely lacking lift, yes, Yarbo's cut will look different from your old mower's. Give it a few mows, and try rotating your Yarbo's mowing lines using auto-rotation, Checkerboard, or Diamond, and your yard will take on a look that's been described as “natural.”
¶ Deadends
- Deadends are the Mower's Secret Weapon.
- Deadends are paths you map for the mower to follow pretty much exactly. They start in an Area, send the mower out, and have the mower reverse back. What makes them invincible is Deadends ignore No-go Zones. This means you can sneak them in where the rover won't normally go, such as a narrow corridor between a No-go Zone and an Area boundary or in between a couple of spruce trees.
Map a Deadend starting in an Area. The start of a Deadend should be well away from any obstacle.
Deadends can be within an Area or extend outside the Area. You can send them right through a No-go Zone.
Deadend notes:
- Add Deadends to your Work Plans so they get mowed.
- You set the blade height and speed in the Deadend's Settings, as you do a Pathway.
- The rover won't spin around in a Deadend, so they're great for tight spots.
- You can keep Deadends close to things especially if you don't make sharp turns, even if there is a No-go Zone. Deadends can be hooked around trees and posts and even be made into a large circle around something, turning your mower into a weed whacker…kinda…a poor one…but it tries.
- You can stack Deadends next to each other, so you can mow a pocket. If you stagger the starts of the Deadends so the second Deadend begins along the path of the first one, the rover may not need to turn and may not even shut down its blades. This can help your grass.
- Deadends may be mowed backwards. In the case where it's more efficient, Deadends can be mowed in reverse – back end of the rover in first. Usually this is a case where the rover exits a Pathway near the start of a Deadend, and it makes more sense to go in reverse into the Deadend instead of spinning the rover around to go in forward. If this is not desirable, update the endpoint of your Pathway or Deadend to encourage the rover to take the Deadend in a forward direction.
- CAUTION: Turns can be exaggerated in a Deadend, especially when reversing, so if you're turning while mapping a Deadend, make sure the rover will have room. Please TEST your Deadends!
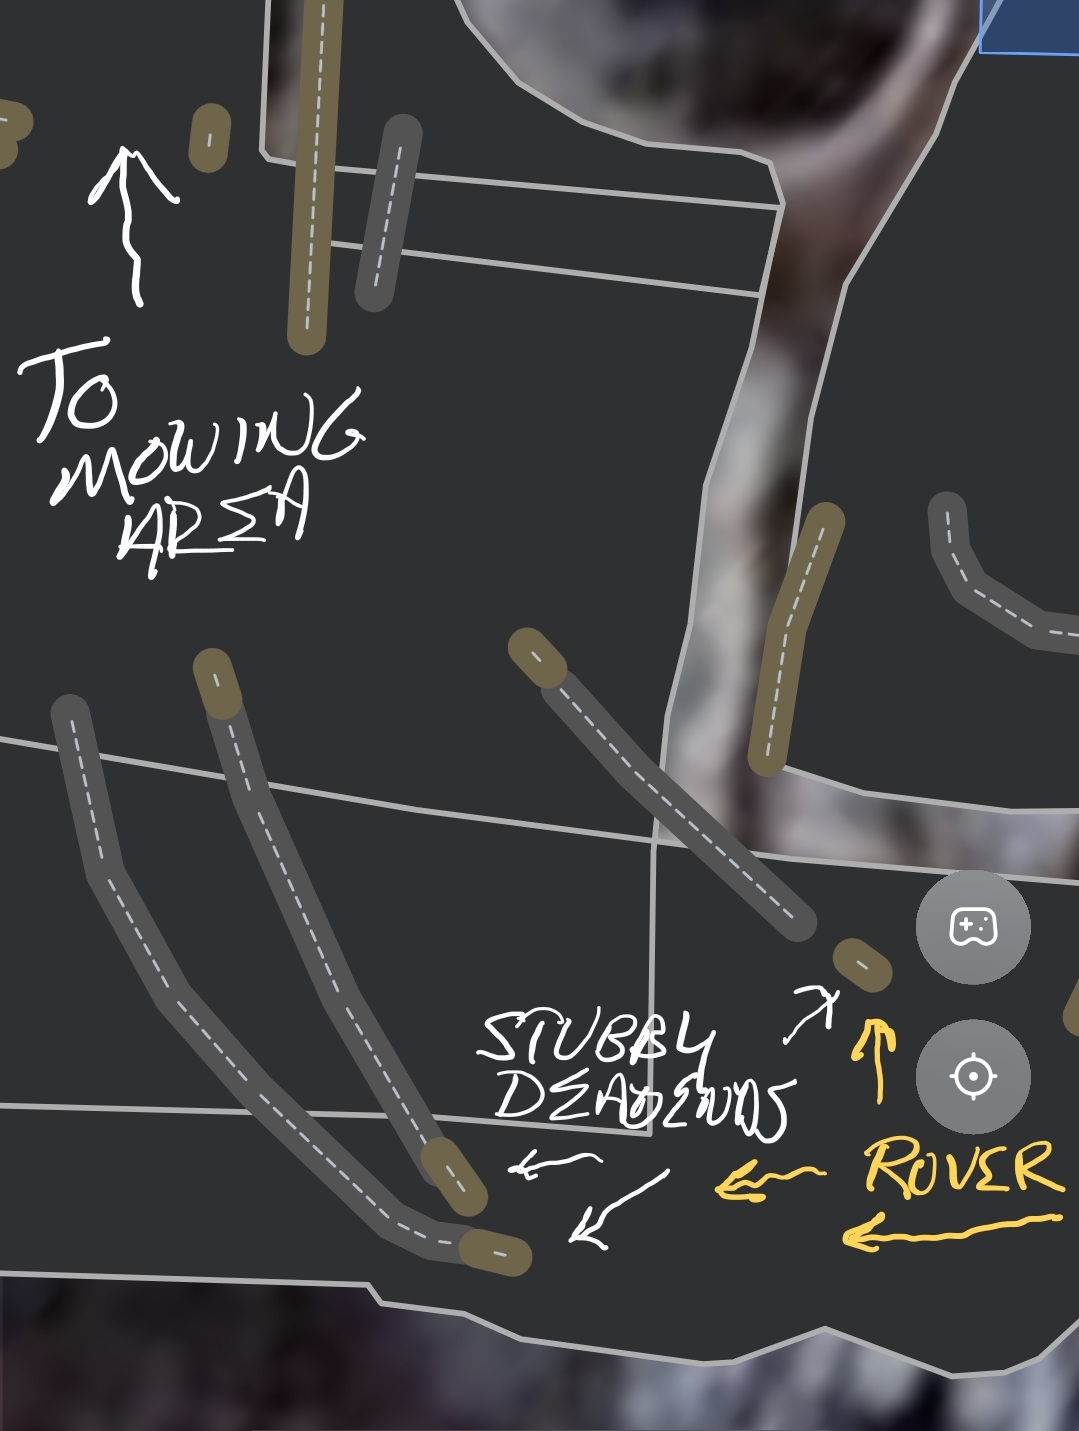
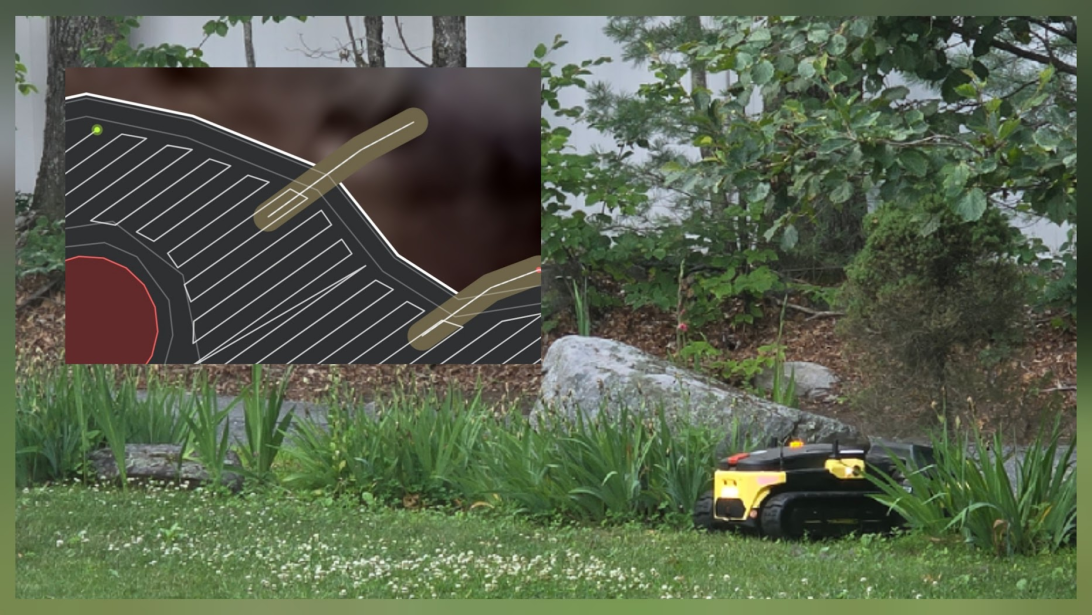
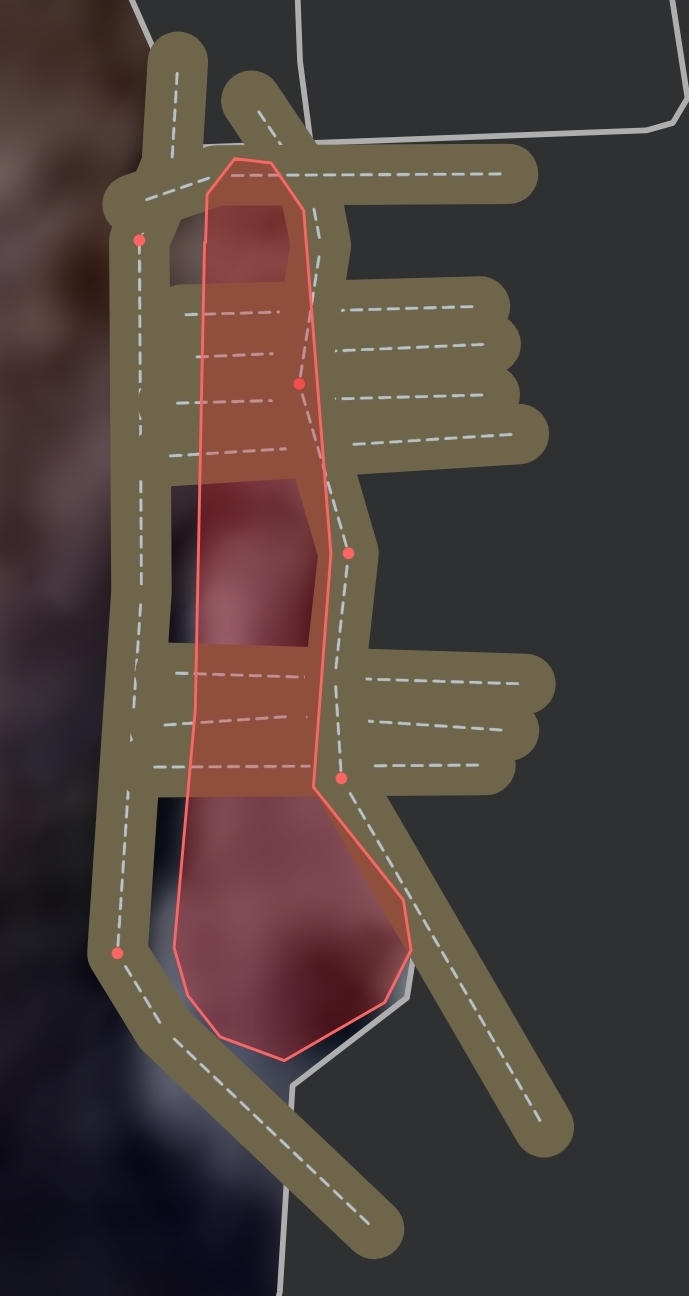
What are "Stubby Deadends"? A nickname for short Deadends that are used in some very clever Helpful Alternative Creative Kludge Solutions, such as part of a method to push the rover to use different Pathways when it goes to navigate.
Vary Pathways Taken:
In the example in the picture, the rover ALWAYS takes the Pathway that starts near the controller icon by default. What if you could pull the rover to the other pathways and use all three evenly to help out the grass, especially if you have several Mowing Areas to get to and do so a few times a week?
The three Stubby Deadends start where the rover will be coming from and end on the nearby Pathway (well, two of them do anyway). If you add a Stubby Deadend to your Work Plans, the rover will go to that Stubby Deadend first, then typically take the Pathway right there to continue navigating to the Mowing Area. (Sometimes the rover will hop off the Pathway or go take another Pathway, you'll need to experiment.) This varies the Pathways taken.
In the picture I have three Mowing Areas and three Stubby Deadends to send the rover out. I'm also going to do Stubby Deadends for the returns. I'll vary the Work Plans so the rover uses the different Pathways.
It's a manual way to go about this, and Yarbo is working on alternatives. But for now, this will help the rover from using the same paths repeatedly.
Pull the rover away from its typical navigation line:
Stubby Deadends are also useful for diverting the rover away from somewhere it doesn't navigate so well, such as a slippery slope or maybe the corner of a chicken wire fence. Add the Stubby Deadend to the order in the Work Plan where you'd like to pull the rover away from the navigation it typically chooses.
¶ Lawn Mower Common Issues
Cutting Height Motor Overcurrent usually occurs when the blades are blocked from being raised or lowered.
- When raised: There is likely a grass biscuit atop the brackets that hold the blade guards in place. Lower the blades, clean out the grass biscuits, and give them as a treat to your horse.
- When lowered: The mower is likely parked on a surface that won't allow the blades to go down.
False Lift and Rollover Detection messages:
- If you see a Lift Detection message, Yarbo Support recommends adjusting the Area's Module Gap setting tighter. This is better suited for uneven or sloped terrain and can help reduce false lift triggers.
- For Rollover Detection, a recent update from Yarbo to improve mowing quality on slopes can sometimes affect the way the IMU (Inertial Measurement Unit) data is processed, and this can cause false Rollover Detections where the mower is working on steep areas. Yarbo plans to add an option to toggle the slope compensation on and off.
- In Working Preference you may turn Rollover & Tilt Detection and Lift Detection off to disable these messages.
Uneven Mowing: Missed Grass Strips
from Yarbo Support (Facebook - Yarbo Users and Community, July 24, 2025)
The issue of missed grass strips can be caused by several factors, including:
- Slight deviations during turns or obstacle avoidance
- GPS signal fluctuations, which may affect Yarbo’s positioning accuracy
- Overlap setting not being properly configured
- Terrain irregularities, such as slopes or bumps
To improve coverage, we recommend increasing the Overlap setting for your mowing area. You can do this in the Yarbo app by following these steps:
- Edit Map → Area Settings → Advanced Settings → Overlap, and set it to 8 inches (the default is 4 inches). This additional coverage can help reduce the chance of missed strips.
As for the machine pulling more to the right or not driving smoothly, this could be due to a variety of causes, such as:
- Uneven track tension or wear
- Obstructions or debris in the drive system
- Terrain-related resistance
- Or potentially a hardware-related issue with the drive motor
To ensure we identify the root cause accurately, we kindly suggest that you submit a support ticket through the Yarbo Support Center. Our technical team will be happy to perform a deeper diagnostic and assist you further.
¶ Towing
The original Tow Hitch slides onto a bracket in the back and is held on with a wing bolt. The new design (Summer 2025) integrates with the new Back Brace Mount.
Your Yarbo's only a little guy, but it can tow a lot of weight for its size. That doesn't mean you can thrash it around. Heed:
- The Tow Hitch is designed to break if the hitch is under too much stress – jackknife, heavy loads, sharp turns, trying to go dowhill with a load, abuse, ...
- Watch the weight you put onto the Tow Hitch. If the tongue weight is too much, the rover will kick up, and the Tow Hitch can snap.
- The rover does not have brakes. If you start towing a heavy load downhill, the rover isn't going to stop.
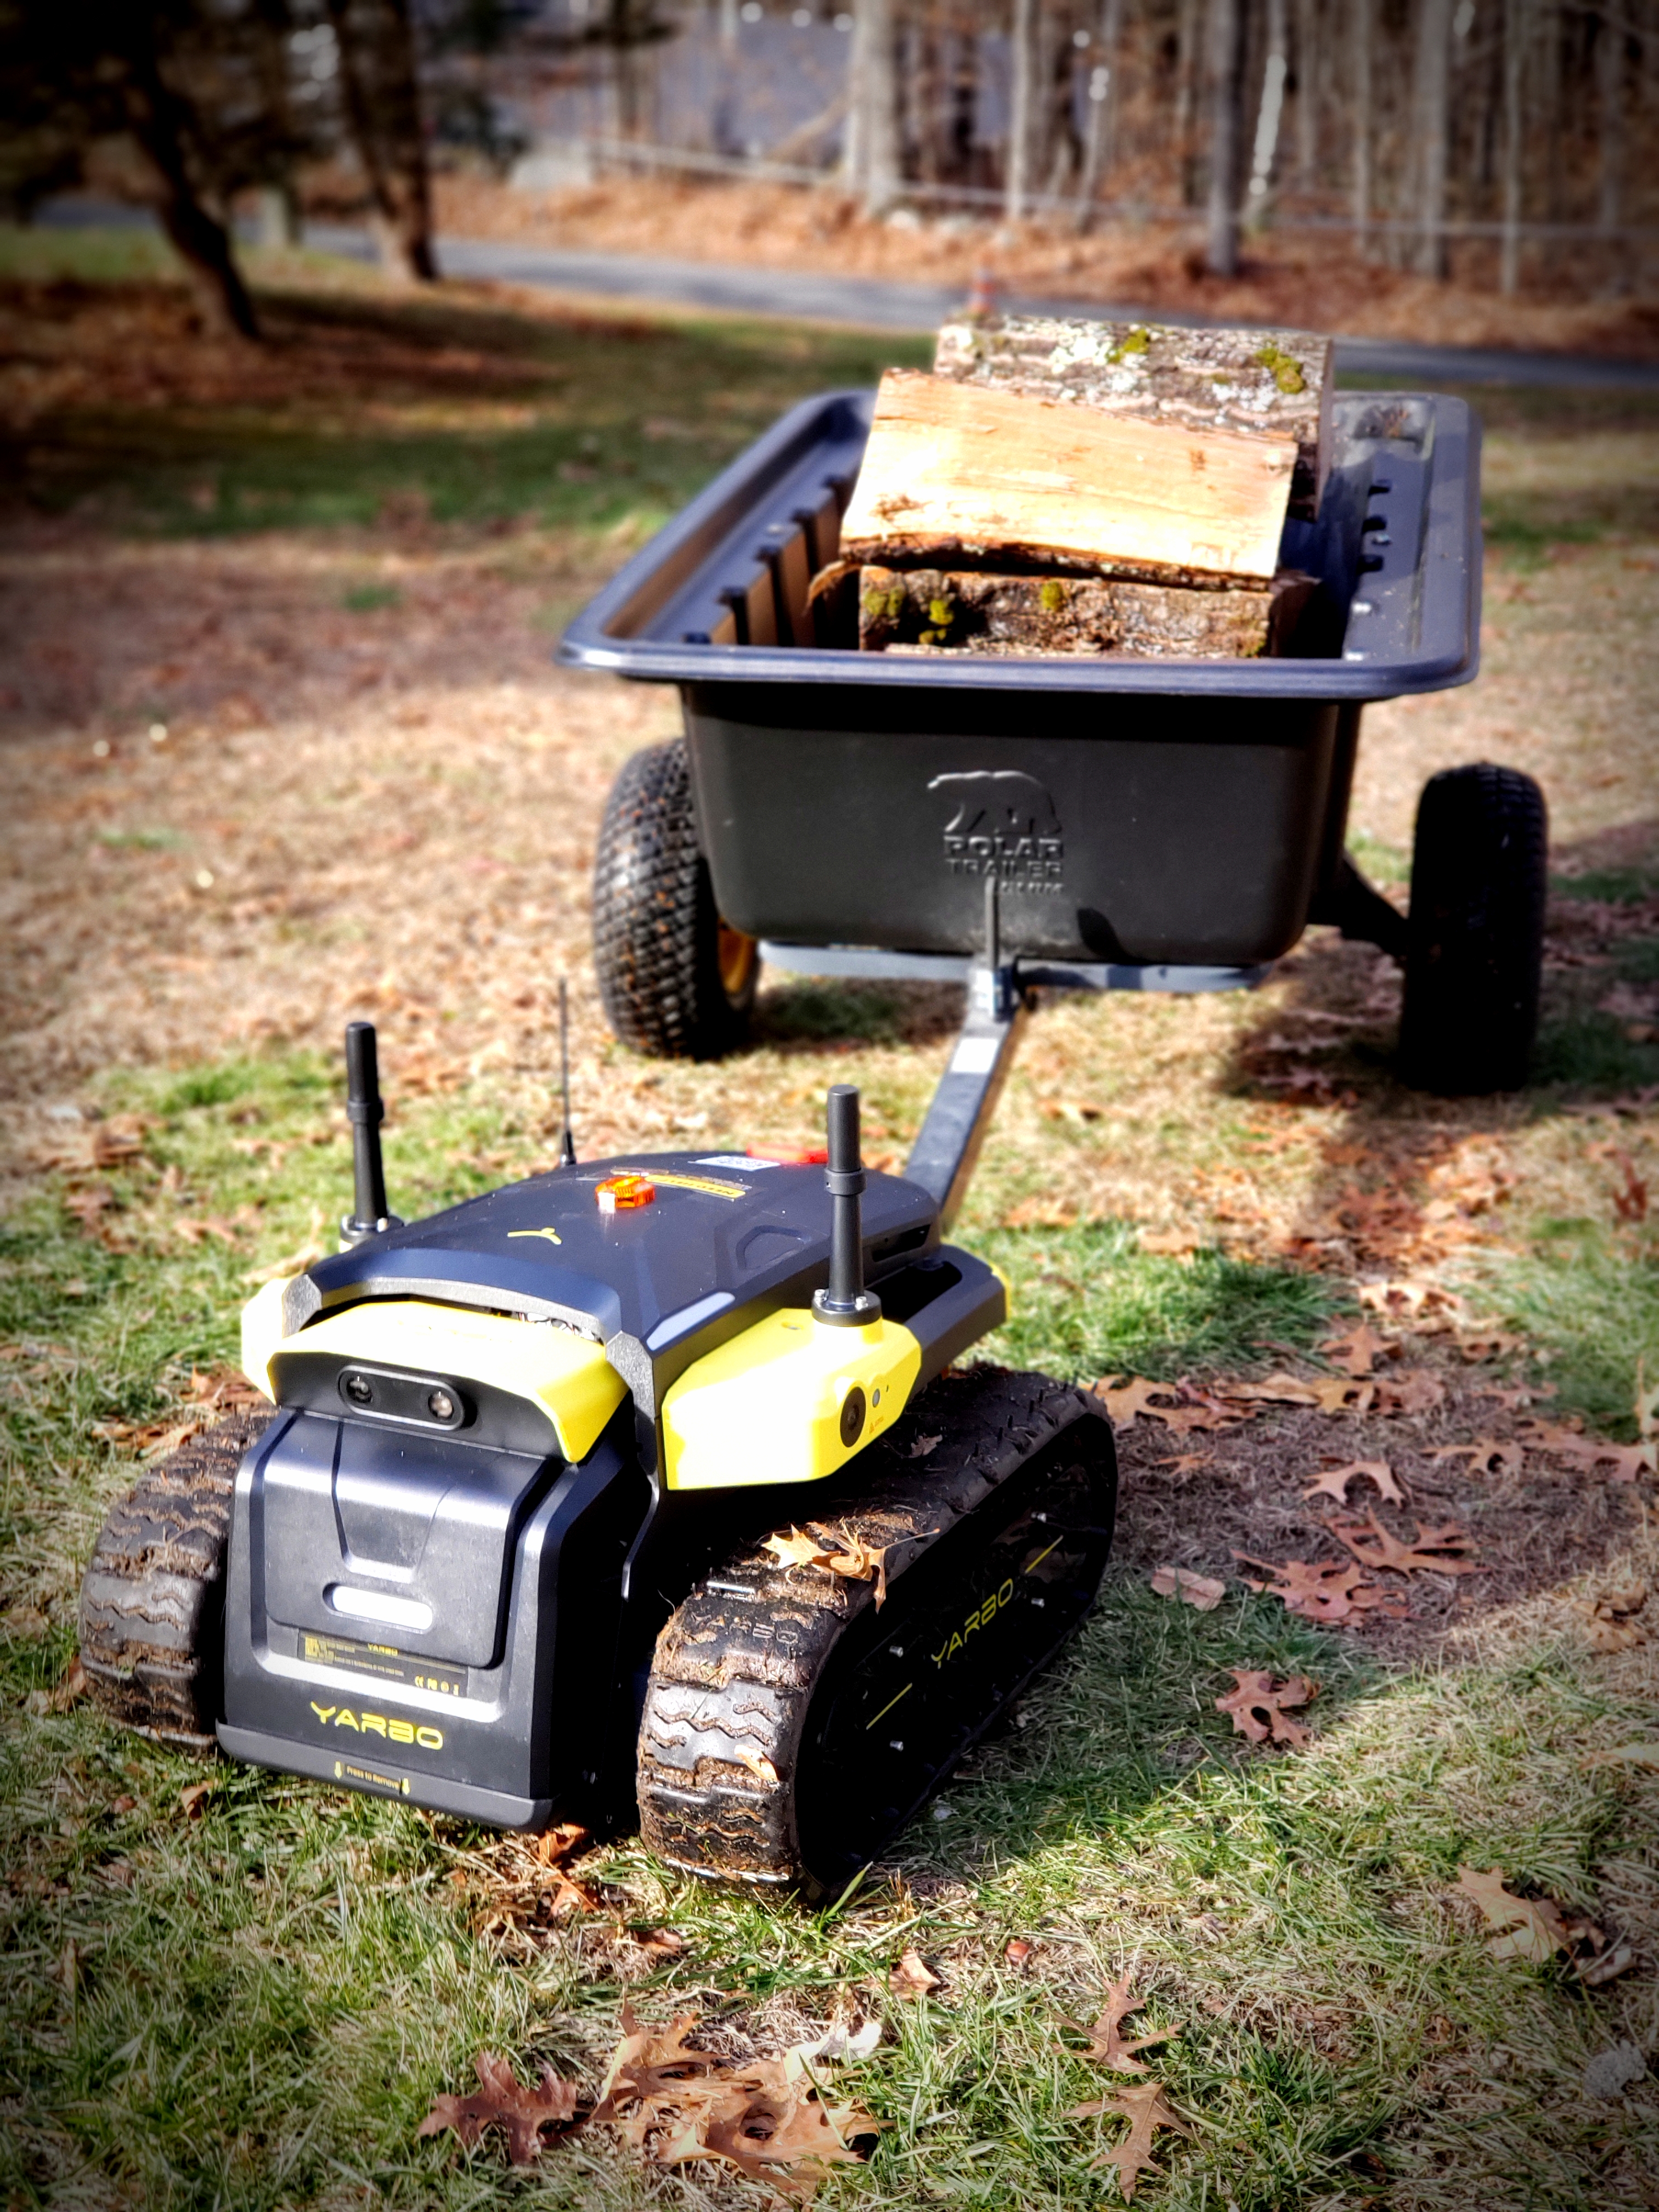
- If you'd like to tow a cart, look for…
- Four wheels at the corners
- A convertible handle that will allow you to use a hitch pin or hitch ball to attach to the Tow Hitch
- The cart shown in the picture has only two wheels - be careful to balance the load if you try that! The picture was used only because it's nice and shows the small rover towing a few hundred pounds of firewood.
- Yarbo recommends using a hitch ball to allow maximum flexibility. It's a ¾" shank diameter.
- Avoid sharp turns and anything situation that may jackknife or bind up the Tow Hitch and whatever you're towing. The Tow Hitch may bend or break, and you can cause damage to your rover.
- Towing weight, original 2024 Tow Hitch:
- For daily/everyday towing, Yarbo recommends loads of around 500 pounds (225 kilograms).
- For “every now and then” to move something in your driveway, in ideal conditions Yarbo can tow 3500 pounds (a little under 1600 kilograms).
¶ New Tow Hitch, Summer 2025
As of this writing, the 2025 Tow Hitch is on the way, due in August 2025. Those who pre-ordered the Trimmer in the original livestream will receive the Back Brace Mount and the updated Tow Hitch (I am unsure if Yarbo will include the updated Tow Hitch in later Trimmer orders). Yarbo's documentation will cover installation and any specification changes with the new equipment. This document will be updated with anything you might like to know that's not covered in official documentation.
¶ Common Issues & Troubleshooting Process For Yarbo
¶ General Steps for Problem Resolution
- If you have issues with your Yarbo that some basic troubleshooting does not resolve, Yarbo Support is available. Social Media sites (Facebook, Yarbo Forum, Discord) can be a great source of information and can offer suggestions for troubleshooting.
- Hard Power Cycles to help clear any number of issues: Pull the PoE power on the Data Center and unplug the rover’s battery. Wait 5 minutes. Power up the Data Center and let it come up. Power up the rover by clicking the power button on the back of the machine. Power cycling in this manner sometimes helps clear error messages or odd issues.
HINT: You can reboot the rover in the App, but you cannot reboot the Data Center. Some people plug the Data Center's PoE injector into an outlet that can be controlled through WiFi. Recommended.
¶ Data Center
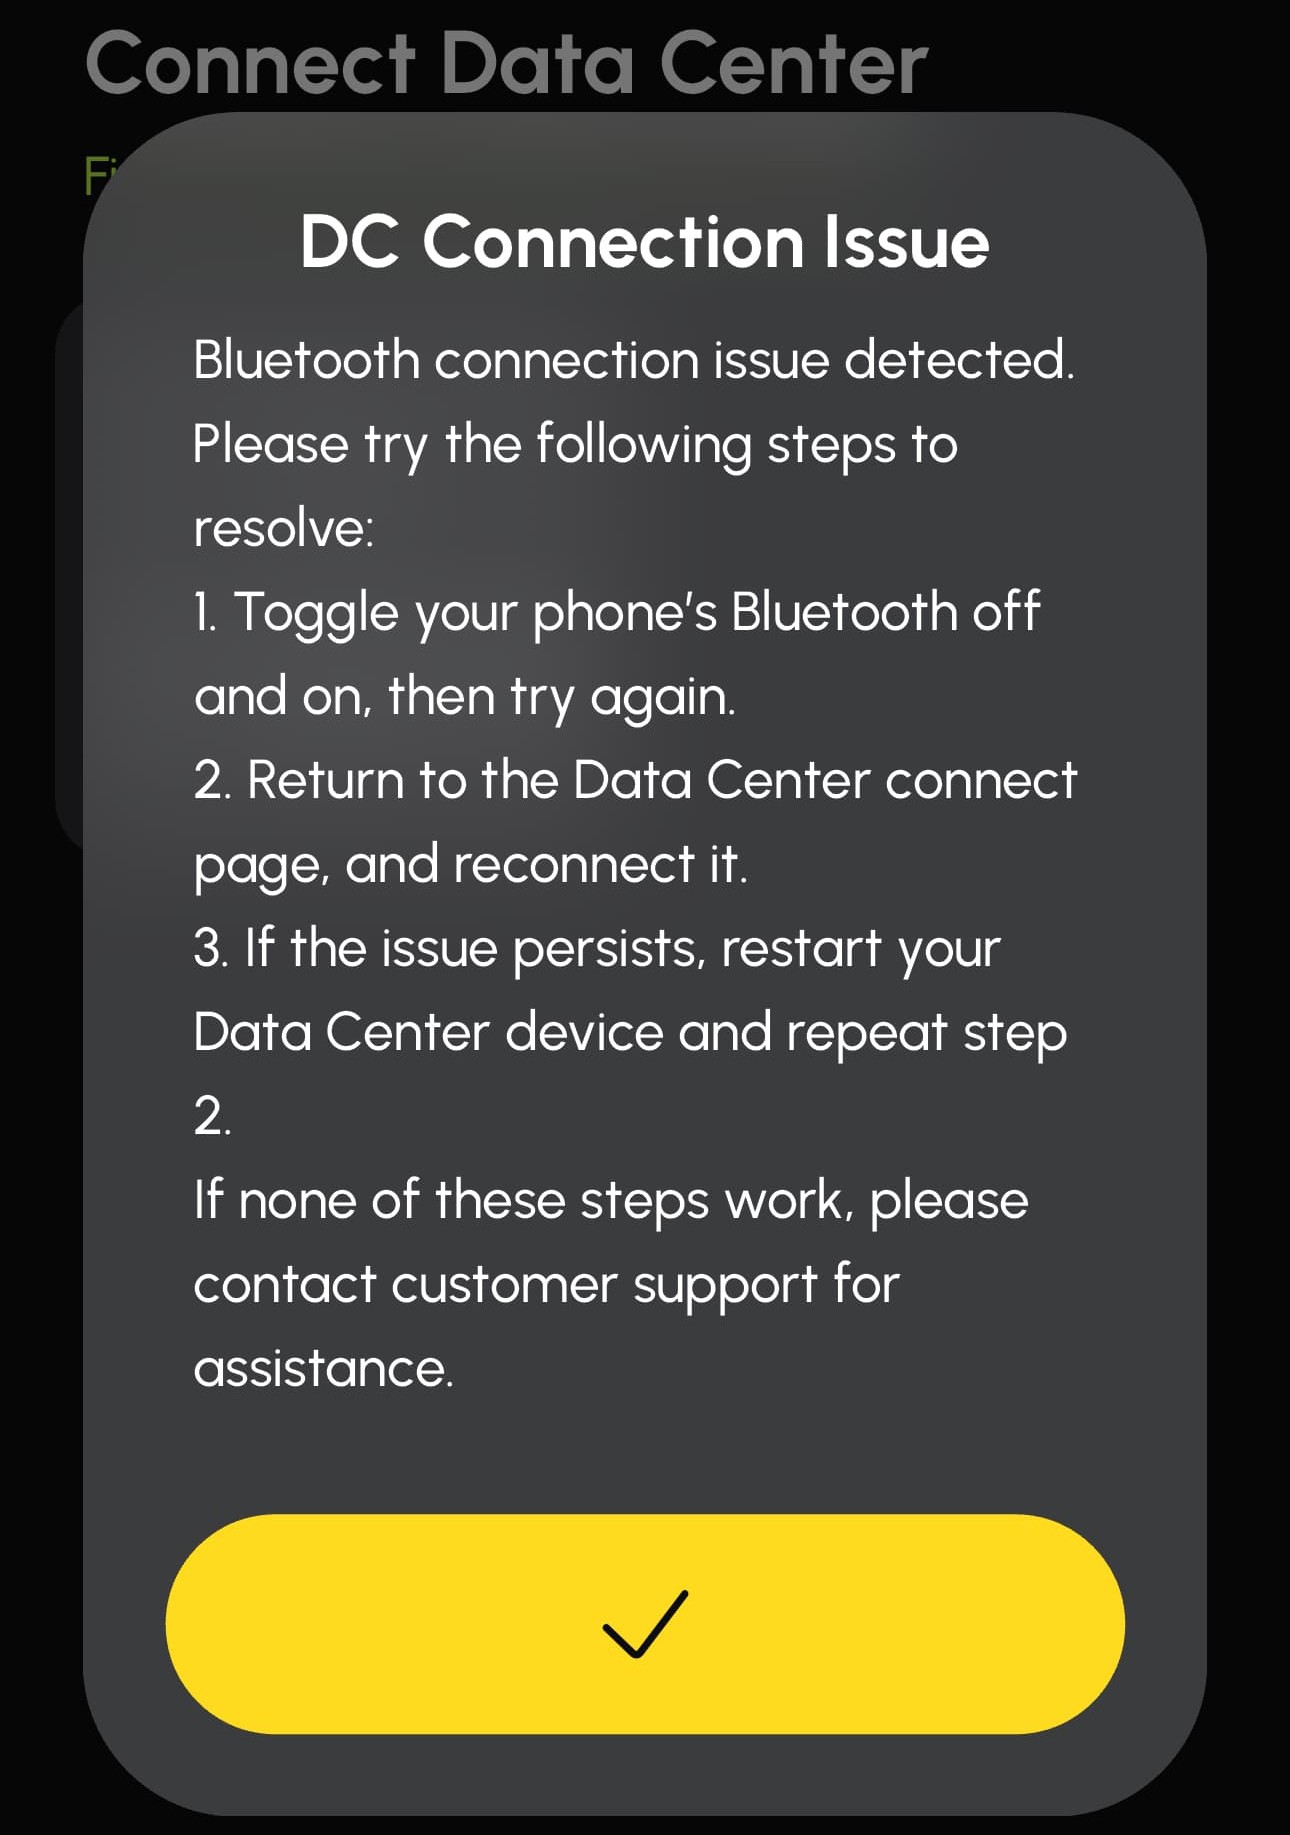
The Data Center DC Connection Issue has a somewhat strange workaround, but hear me out.
The good news is the Data Center rarely gets updates, and you rarely have to connect to it. It just works.
If you see this message, and you've tried the instructions on the screen already, try the following:
⇒ Unplug the Data Center's PoE power for 5 minutes. Plug it back in, and try to connect.
⇒ If that does not work, folks have had luck getting close to the Data Center with their Bluetooth devices. As in CLOSE. As in INCHES. No, seriously. Go to your Data Center as close as possible and attempt to connect. If your Data Center is up on your house, get as close as you can to it safely, even right inside your house from where the Data Center is. You should be able to get a connection at a very close distance and do what you need to do.
As always, contact Yarbo Support for assistance.
¶ GPS
¶ Rover Cannot Get a GPS Signal
Yarbo Support recommends the following if you are unable to get a GPS signal (red GPS icon):
- Make sure both RTK antennas are properly tightened, but not over-tightened (which could damage the connector).
- Try swapping the left and right antennas to rule out any hardware issues.
- Move Yarbo to an open area with clear sky visibility to see if it regains GPS signal.
- Confirm that the Rover’s Wi-Fi is turned off in the diagnostic tools.
- If possible, please share a screenshot of the Diagnostics page showing the GPS status and RTK signal and include with your Support ticket.
|
Moving the Area Boundary Start Point to a Better GPS Location The mapping algorithm determines where along the Area's border the rover will begin work. It is indicated by a small line perpendicular or diagonal to the border. You may use a Helpful Alternative Custom Kludge to move this boundary start location, and I did just that when the mower encountered weak GPS in the spot it chose. By creating a square Template No-go Zone and placing the corner of it barely into the Area, the mapping algorithm senses the No-go Zone's presence and can be made to move the start point of the border right to that little bit of a No-go Zone. In my case this little trick pulled the rover to start where the GPS is good, whereas before it would show up to start work in the Area and act a little bit confused. Note that it may take a try or two to get this right. You don't have to have weak GPS to move the Area boundary's start point. Another case of mine started this boundary in a tight corner. I followed this process, and the work is now started in a more open part of the Area. |
|
¶ Losing GPS during a Work Plan
- If you lose GPS during a Work Plan, have the rover wait 30 minutes. During that time satellites will move around, and the rover may lock on to a better GPS signal and continue its work automatically.
If still no GPS after 30 minutes (or sooner if you are impatient or have had 3 cups of coffee that morning), you can Pause the Work Plan and use Smart Vision or your App or manual controller to move the rover into the open. Try to keep the rover within the Area where it stopped or at least another mapped Area to make resuming the Work Plan easier. When you get GPS back (GPS icon goes green), you may drive the rover back to the Area it was working or just resume the Work Plan. When you start or resume a Work Plan, as long as the rover is in a mapped location and can navigate, the rover will know where to go. Fingers crossed the GPS signal will stay locked in from then on, but it is what it is, especially under tree canopy. You may be doing this a few times.
¶ Other GPS Issues
Rover in the middle of nowhere on the map, may even be outside the mapped boundary in real life. Message about the rover being “4.x feet” outside the boundary. At best seeing your rover on your map way outside of your mapped locations is amusing, but at worst your rover is somewhere other than where it should be. Generally this happens with a weak GPS signal where the rover attempts to continue on. The GPS condition usually corrects itself, returning the rover to normal function where you can simply resume your Work Plan (if the rover is in your mapped Area). If the rover is outside the map, drive it manually or through Smart Vision to where it should be. Confirm visually the rover is in the same spot on the map as it is in real life. If GPS is again green and stable, resume your Work Plan, and keep an eye on the rover “just in case.” If it happens frequently in the same location, you will need to look into the Diagnostics page for the GPS and Data Center communications conditions and deal with that if things don’t look right. Yarbo is always tweaking GPS reliability and how the rover uses GPS, and with that and Vision enhancements, Yarbo’s unplanned time spent Off The Ranch should see improvement.
- Map Drift: For some reason the Data Center and the rover stopped agreeing on where the Docking Station is. If you get this error, try to let it resolve itself by waiting, driving the rover off the Docking Station and locking onto GPS and then back onto the Docking Station (and waiting), or power cycling the Data Center and rover. Using map drift correction when not absolutely necessary can shift your maps and unhook them from the real world, and you’ll need to re-map. See the document Map Drift Correction to diagnose and resolve Map Drift.
- Network issues can show up as GPS problems. Issues in your network can cause the rover to pause with GPS errors for over a minute, move a few feet, then pause again – and have similar issues. Often this is because the Data Center and rover are switching back and forth between WiFi and HaLow. Network issues cause the Data Center and rover to rework how they communicate their GPS data, and it takes a minute or so with each network burp. You must ensure your network is working properly, especially if you are not hardwired to your router as recommended and are using a WiFi Extender device.
Most folks turn off WiFi in the rover. It doesn’t have to be on and in some cases can cause instability as the rover goes in and out of WiFi range. Cell also doesn’t “have to be” on unless you wish to allow HaLow to fail over to Cell or locate the rover should it leave HaLow range.
Losing GPS Connection - Recommendations from Yarbo Support
(Facebook - Yarbo Users and Community, July 23, 2025)
[A screenshot of the customer's diagnostics page was provided, which Yarbo used to diagnose the issue.]
Based on the screenshot you provided, we noticed that the RTK Rover Status is 0, which indicates that the rover is currently not receiving GPS data. This could be caused by several factors, and we’d like to share some troubleshooting steps that may help:
Please check the following:
1. RTK Antenna & Connections: Ensure the RTK antenna is securely connected and positioned with a clear, unobstructed view of the sky. Please double-check and tighten all RTK wire connections between Yarbo and the antenna (see the diagram below for reference if needed).
2. Data Center GPS Signal: Make sure your Data Center also has a clear sky view and is receiving signal from at least 25 satellites. If it's placed near buildings, trees, or inside a shed, try relocating it to a more open space.
3. Yarbo Core GPS Status: The Yarbo Core should be receiving data from around 20 satellites. If it's located under dense foliage or close to tall objects, this may interfere with GPS reception.
4. Network & Hardware Reset: Try unplugging and reconnecting the POE cable from the Data Center to reboot it. On the Yarbo app, go to Yarbo Settings > Safety Settings > Restart Yarbo System to reboot Yarbo Core.
If the RTK Rover Status remains at 0 for more than 2 minutes after these steps, we recommend submitting a support ticket through the Yarbo Support Center. When doing so, please include the following:
- Your device serial number (SN)
- Your current location (e.g., city/province)
- A brief description of the issue
- A screenshot of the RTK status screen
- A short video (if possible) showing the environment and antenna placement
This will help our technical team diagnose the issue more efficiently and determine if further action is needed.
¶ Maps
Work Plan won’t run, error about needing to create the map per the documentation: Generally this happens because you are missing a Pathway from where the rover is to where you want it to go. Review your mapped items, especially Pathways.
¶ Resources
¶ Social Media, etc.
There are YouTube videos, Facebook posts, and Yarbo Forum posts (Yarbo Forum also has a summary of feature requests and status). Join the Yarbo Community on Discord for LIVE sessions with our fine Product Pioneers and Yarbo Tech Support and Development.
- Official Facebook:
- Other Facebook Groups (created and administered by Facebook users):
- YouTube Channel: https://www.youtube.com/@yarboglobal
- Yarbo Forum
- Discord:
Yarbo Support’s KB Articles on the Yarbo web site are easily searched and useful. Check out the recommendations for maintaining track grease and how to understand the diagnostics page.
¶ And now…off ya go! Happy mowing! Umm…snowblowing….towing…trimming…leafblowing…
Map, TEST, tweak, TEST, observe, dial it in.
This document came from a TL;DR reply to a post on Facebook I wrote a short time ago, and I threw in some updates here. Please comment with corrections (be nice!) and topic suggestions. I hope this helped someone and actually proves to be factual. Cheers! - Facebook: Ken Leonard - Forum @Ken
With add’l contributions/suggestions from:
- Forum members: @steve, @bryan.wheeler, @Yarbo-Forum, @dandbstephens, @shanie, zaped212
- Facebook: Kent Ross, Yarbo (Yarbo Support), Von Tom
¶ Document History/Changes
As this document is ridiculously all over the place, here's a quick change list so you can find new information:
2025-10-01 - kl - Battery % indicator incorrect/stuck
2025-08-14 - kl - Some add'l solar numbers.
2025-08-13 - kl - Moving your Data Center means a re-map.
2025-08-10 - kl - Deadends may be mowed backwards. Removed errant image.
2025-08-08 - kl - PoE power use (based on a Forum post)
2025-08-07 - kl - The Hand Controller (A Way Too Quick Start Guide) / “install the rover first in the App, then the Data Center”
2025-08-06 - kl - M1 Mower (Original) vs. Mower Pro
2025-08-05 - kl - Snowblower Game-Changers for 2025
2025-08-03 - kl - Solar Charging
2025-07-29 - kl - Added links to User-created FB groups
2025-07-25 - kl - Mapping - Add Background / Lawn Mower - How often should you mow?
2025-07-24 - kl - Troubleshooting - GPS - Move Area Boundary Start Point / Lawn Mower Common Issues - Uneven Mowing, Missed Grass Strips / Troubleshooting - GPS - Losing GPS Connection (Recommendation from Yarbo Support) / Common Issues - DC Connection Issue
2025-07-23 - kl - Yarbo In Action - Towing / Life With Yarbo - BT Speaker / Maps - Managing Overlapped Modules
2025-07-22 - kl - The Battery - Charge indicators / Life With Yarbo - Yarbo and plans for Home Automation. / Also got artsy with the “L” picture.